- Canon Community
- Discussions & Help
- Printer
- Professional Photo Printers
- Re: Canon Pixma Pro-100 Printing Too Dark
- Subscribe to RSS Feed
- Mark Topic as New
- Mark Topic as Read
- Float this Topic for Current User
- Bookmark
- Subscribe
- Mute
- Printer Friendly Page
Canon Pixma Pro-100 Printing Too Dark
- Mark as New
- Bookmark
- Subscribe
- Mute
- Subscribe to RSS Feed
- Permalink
- Report Inappropriate Content
11-19-2018 11:18 PM
Hi there,
I'm an artist who just bought a Canon Pixma Pro-100 to print photos of my oil paintings My intent is to sell the prints. I'm using an early-2015 13 inch Macbook Pro running macOs High Sierra. I'm using Canson Rag Photographique Ultra Smooth 310g/m paper. I've been printing using Adobe Photoshop CC and also trying Preview. I downloaded the Rag Photographique ICC Profile and installed it in ColorSync. My Macbook Pro screen is not calibrated, and I don't even really know what it means to do that.
The photos of my paintings are printing too dark using both Preview and Photoshop, but the problems with the image are worse when I print using Photoshop.
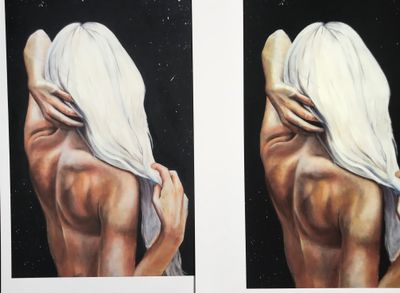
On the left is a print from the Preview application and a print from Photoshop w/ICC profile is on the right:
As you can see, the Photoshop version is tinged almost green and there is far too much black/gray.
Here is the digital image of the painting:
I'd like the print to more closely resemble the digital image. I'm losing a lot of oranges and yellows in both print but I'm particularly disappointed with the Photoshop version of the print.
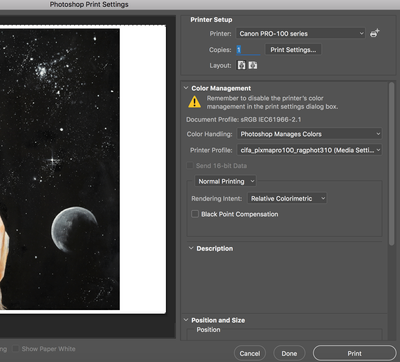
Here are my settings in Photoshop:
I don't know what Black Point Compensation or Relative Colorimetric means at all.
Any help is appreciated! Thank you 🙂
- Mark as New
- Bookmark
- Subscribe
- Mute
- Subscribe to RSS Feed
- Permalink
- Report Inappropriate Content
11-20-2018 10:53 AM - edited 11-20-2018 01:37 PM
Greetings,
Black Point Compensation:
This ensures the depth of black color in your image matches the black color output capability of your device (printer). It isn't perfect depending on the color depth of the file being printed.
Relative Colormetric:
This setting affects color rendition.
Relative: Compares the white of the source color space to that of the destination color space and shifts all color accordingly. Maintanins color accuracy across entire gamut. Probably best for images with primary colors.
Perceptual: Better choice for images with tertiary colors, comprised of multiple shades and gradients. This settings might make colors look more natural to the human eye.
Correct monitor calibration and paper choice also matters a great deal. Calibrating ensures what you see is true from a color and light perspective. With paper, its good not to go cheap. Sounds like you are using good quality media.
~Rick
Bay Area - CA
~R5 C (1.1.2.1), ~R50v (1.1.1) ~RF Trinity, ~RF 100 Macro, ~RF 100~400, ~RF 100~500, ~RF 200-800 +RF 1.4x TC, BG-R10, 430EX III-RT ~DxO PhotoLab Elite ~DaVinci Resolve Studio ~ImageClass MF644Cdw/MF656Cdw ~Pixel 8 ~CarePaks Are Worth It
- Mark as New
- Bookmark
- Subscribe
- Mute
- Subscribe to RSS Feed
- Permalink
- Report Inappropriate Content
11-20-2018 08:35 PM - edited 11-20-2018 08:44 PM
Since you just installed the printer go to System Preferences->Printers & Scanners and verify that you have the IJ deries printer installed and not the AirPrint version.
Verify that you selected the correct Canon media type, Other Fine Art Paper 1 (as recommedned by Canson) in the printer driver.
Download Canon Print Studio Pro (PSP) from the canon support site. It is a plugin for Photoshop and will help with the various settings.
Frequently the reason prints look too dark is that the monitor is too bright. Download the following test image, open it in PS and print. Do not make any adjustmenst regardless of how the image looks on screen.
http://www.outbackphoto.com/printinginsights/pi049/essay.html
Then print should look good- proper color and brightness. Then compare ith your monitor and eyeball monitor brightness to be close to the print - they will rarely be the same.
You can also print a test pattern in PSP and it will tell you an adjustment you can make to your printer to control brightness.
Conway, NH
R6 Mark III, M200, Many lenses, Pixma PRO-100, Pixma TR8620a, Lr Classic
- Mark as New
- Bookmark
- Subscribe
- Mute
- Subscribe to RSS Feed
- Permalink
- Report Inappropriate Content
11-23-2018 12:46 PM
Welcome to the world of "color management".
You've created a painting... it has colors in it.
Somehow you have to capture an image of that painting and get it into the computer. Depending on how you do this (using a camera to capture a photograph ... or using a scanner, etc.) there's potential to skew the color accuracy.
Once it is displayed on your monitor, the monitor itself may not be accurate. This means that as you adjust colors to what you believe they should be ... the monitor may be tricking you into choosing poor values (suppose the monitor is displaying things a bit too "blue" or "cool" so you warm them up... only to find that your prints come out too orange or too "warm").
And then of course there is the printer itself. The accuracy will also change if you switch paper type or ink type.
The are calibration tools for all of this to allow for a "color-managed workflow".
While you are asking about the printer ... even if your printer calibration is spot-on-accurate, you can be tricked if your original image capture wasn't accurate... but you didn't realize it because your display also wasn't accurate.
I was a victim of this... I thought my display was accurate. Other photographers commenting on one of my images mentioned it looked really orange. I thought that was all subjective because it looked great to me. Then one day while visiting another local photographer friend, he showed me what my image looked like when displayed on his computer monitor. WOW... was it ever orange! (For the first time I knew what everyone else meant). I ended up buying a calibration tool and that solved the problem.
How do you isolate where the color inaccuracy is creeping into your workflow?
You *could* drop a lot of money on calibration tools ... but before you do that, you may as well grab a printer evaluation image and use it to test the printer and color profile.
Go to this page: http://www.outbackphoto.com/printinginsights/pi048/essay.html
You'll see a write-up of the test image. Don't grab the JPEG image on the page... scroll down to find the link to download the 40MB TIFF image (the JPEG wont be accurate ... the TIFF image will be accurate).
There's also a write-up of what to look for in each section of the evaluation image.
Remember that you MUST be using room lighting that is "neutral". If you use "warm white" light bulbs... they are going to impart a slightly yellow color-cast on your prints as you evaluate them. I have a special color-balanced light at my desk that I use when evaluating anything where color accuracy matters (and it's floresescent ... which means I have to leave it on for a few minutes before it reaches the correct temperature to have accurate neutral light). Any art store that sells painting and artist supplies... probably sells such lights.
As for Photoshop and the "Rendering Intents" ... just hover your mouse over the pull-down field and the description box will appear ... explaining what that particular choice will do.
For any printer (or display), there's a range of colors that it can accurately represent. That's referred to as it's "color gamut" (e.g. a box of 8 Crayola crayons has a color gamut... but a box of 64 Crayola crayons has a wider color gamut).
What do you do when your source image has colors that the printer cannot accurately reproduce (out-of-gamut colors). Rather than just not print anything... it typically needs to "shift" the out-of-gamut colors to an in-gamut color. But there are choices to be made in exactly how this happens... because an out-of-gamut color could get shifted to a color which is identical to an in-gamut color that your print needs ... and now two colors that are supposed to appear different will end up looking the same. So *maybe* you want the printer to shift already in-gamut color to a different in-gamut color to maintain the perception of difference.
Anyway that's the general idea ... but hover-over the choices to read the descriptions and hopefully it will make more sense.
5D III, 5D IV, 60Da
01/20/2026: New firmware updates are available.
12/22/2025: New firmware update is available for EOS R6 Mark III- Version 1.0.2
11/20/2025: New firmware updates are available.
EOS R5 Mark II - Version 1.2.0
PowerShot G7 X Mark III - Version 1.4.0
PowerShot SX740 HS - Version 1.0.2
10/21/2025: Service Notice: To Users of the Compact Digital Camera PowerShot V1
10/15/2025: New firmware updates are available.
Speedlite EL-5 - Version 1.2.0
Speedlite EL-1 - Version 1.1.0
Speedlite Transmitter ST-E10 - Version 1.2.0
07/28/2025: Notice of Free Repair Service for the Mirrorless Camera EOS R50 (Black)
7/17/2025: New firmware updates are available.
05/21/2025: New firmware update available for EOS C500 Mark II - Version 1.1.5.1
02/20/2025: New firmware updates are available.
RF70-200mm F2.8 L IS USM Z - Version 1.0.6
RF24-105mm F2.8 L IS USM Z - Version 1.0.9
RF100-300mm F2.8 L IS USM - Version 1.0.8
- PIXMA MG3620 Print preview cuts off part of document in Desktop Inkjet Printers
- PIXMA TR7820 How to scale document size via Canon Print app in Printer Software & Networking
- PIXMA TR8620 not printing wirelessly in Printer Software & Networking
- PIXMA iX6580 Vertical Stripes on prints in Desktop Inkjet Printers
- PIXMA TS5100 - Won't Print in Desktop Inkjet Printers
Canon U.S.A Inc. All Rights Reserved. Reproduction in whole or part without permission is prohibited.


