- Canon Community
- Discussions & Help
- Printer
- Office Printers
- Re: How do I enable the scan to email address func...
- Subscribe to RSS Feed
- Mark Topic as New
- Mark Topic as Read
- Float this Topic for Current User
- Bookmark
- Subscribe
- Mute
- Printer Friendly Page
- Mark as New
- Bookmark
- Subscribe
- Mute
- Subscribe to RSS Feed
- Permalink
- Report Inappropriate Content
01-22-2017 08:10 PM
Hi, I have a color imageclass MF628cw and on the printer screen it gives me the option to scan to email adress but it does not scan anything to the email adress I put into the address field.
I can go to the canon scan utility on my computer and then it will scan it and open it up in my email but I cannot do that directly from printer. Can anyone help me set this up? Thank you
Solved! Go to Solution.
Accepted Solutions
- Mark as New
- Bookmark
- Subscribe
- Mute
- Subscribe to RSS Feed
- Permalink
- Report Inappropriate Content
11-26-2018 12:15 PM
Krill13,
So for me the only thing I did differently, that wasnt explained in the Cannon Forums or online videos, was the "App Specific Password". So to cut to the chase and avoid doing a long disertation with photos I did the following:
1) Create your "App Specific Password" through your email client if your using 2 Factor Authentication
2) Log into the printer (Obviously)
3) Click on "Settings and Registration"
4) From the left hand tree pane head over to "Preferences>Network Settings>Port Number Settings
5) If you havent done it already change "SMTP" from port 25 to 587. Ports 465 and 587 are intended for email client to email server communication - sending email. Save it.
6) Then from the left hand tree pane head over to "Function Settings>TX Settings>Network Setting - E-Mail/I-Fax Settings.
7) Enter the following:
a) SMTP Server Name: smtp.mail.me.com
b) Email Address: Your full iCloud email address
c) SMTP Authentication should be turned ON
d) User Name: Your full iCloud email address again
e) Password: Your "App Specfic Password"
f) The "Use TLS for SMTP" should be checked since most email clients use SSL and TLS these days.
g) Leave everything else default.
h) Save and reboot your device. I dont have a reboot feature so I have to turn the power of and back on after 10 seconds.
Note: If that doesnt work then your probably going to have to call Canon Support. Hope this helps.
Respectfully,
TonyNC
- Mark as New
- Bookmark
- Subscribe
- Mute
- Subscribe to RSS Feed
- Permalink
- Report Inappropriate Content
02-02-2017 09:35 PM
Hi JohnTiemann.
I will be able to assist you.
First, you will need to activate the Send Function Setting Tool. Please follow the instructions below:
1. Start a Web Browser.
2. Enter "http://<IP address of the machine>/sendsupport_login.html" in the address field, and press the [ENTER] key on the keyboard.
Once the Send Function Setting Tool is activated, please follow these steps to configure the Send to E-mail settings:
1. Click [Start] on the Send Function Setting Tool web page.
To log on in the Administrator Mode:
a. Enter the system manager ID in [System Manager ID] and system manager PIN in [System Manager Password].
b. Click [Logon].
2. Click [Send to E-mail Settings].
3. Specify the required settings.
[Favorites Number] - Select from the drop-down menu.
[Name for Favorites Number] - Enter the name for identifying the Favorites number.
[Destination E-mail Address] - Enter the e-mail address that you want to send your scans to.
[SMTP Server] - Enter the name of the SMTP server.
[SMTP Authentication] - Select [Not Set] or [Set] based on the authentication settings of the SMTP server. When [Set] is selected, enter the user name in the [User Name] text box and password in the [Password] text box.
NOTE:
Authentication methods for sending e-mails
- To prevent e-mail transmissions by unauthorized users, the machine supports SMTP authentication (SMTP AUTH) and POP before SMTP. For more information on the required authentication method, contact your Internet service provider or network administrator.
- POP before SMTP authentication can only be configured by using the Remote UI. See "Configuring Advanced E-mail Settings" in the e-Manual.
4. Click [Next].
5. Check the settings and click [Register].
6. Restart the machine. Turn OFF the MF628Cw for at least 30 seconds, and turn it back ON.
IMPORTANT
Additional settings may be required depending on the network you are using. For more information, contact your Internet service provider or network administrator.
Once the machine is back on, please scan a document. If the error persists, please call us at 1-800-OK-CANON (1-800-652-2666) for further assistance.
- Mark as New
- Bookmark
- Subscribe
- Mute
- Subscribe to RSS Feed
- Permalink
- Report Inappropriate Content
06-09-2017 09:14 AM
Hi,
I have an MFB624CW and I followed your instructions. I'm using icloud as an email service.
They require SSL authentication via port 587.
In admin menu under networking/e-mail-i-fax settings I have set the following parameter.
SMTP server: smtp.mail.me.com
Authentication SMTP: my email
Password: my password
how do I set SSL port 587 ? I can see use TLS for SMTP (tried with no success)
One particularity of my icloud account have have set two factor authentification, do you think it might be the issue ?
Thx
JD
- Mark as New
- Bookmark
- Subscribe
- Mute
- Subscribe to RSS Feed
- Permalink
- Report Inappropriate Content
08-10-2017 06:29 PM
To set the SSL Port to 587 on the printer:
Go to: Network settings --> TCP/IP Settings --> (scroll down to) Port Number Settings -->(scroll down to) SMTP, then type in "587" and click "Apply"
- Mark as New
- Bookmark
- Subscribe
- Mute
- Subscribe to RSS Feed
- Permalink
- Report Inappropriate Content
11-04-2017 11:35 AM
Email is sent out OK but the sender address is blank and that goes to SPAM folder by most email servers. Is it possible to assign an sender address?
- Mark as New
- Bookmark
- Subscribe
- Mute
- Subscribe to RSS Feed
- Permalink
- Report Inappropriate Content
11-27-2017 12:19 AM
Hi z54533.
I will be able to assist you.
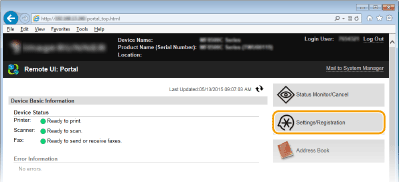
Please verify that you have entered the email address in the [E-Mail/I-Fax] settings in the Remote UI, by following the instructions below:
2. Click [Settings/Registration].
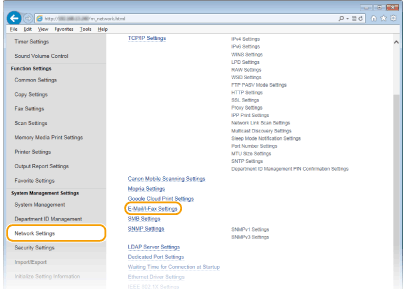
3. Click [Network Settings]
 [E-Mail/I-Fax Settings].
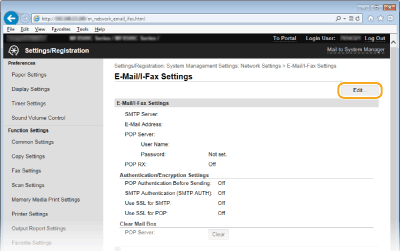
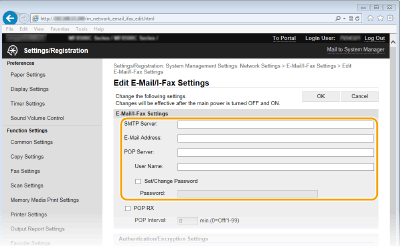
Enter up to 48 alphanumeric characters as the SMTP server name (or IP address) for sending e-mail and I-Faxes.
Enter up to 120 characters for the e-mail address that you want to use for the machine.
Enter up to 48 alphanumeric characters as the SMTP server name or IP address for sending e-mail and I-Faxes.
Enter up to 64 alphanumeric characters as the user name for the specified e-mail account when a POP3 server is used.
To set or change the password when a POP3 server is used, select this check box and enter up to 32 alphanumeric characters in [Password].
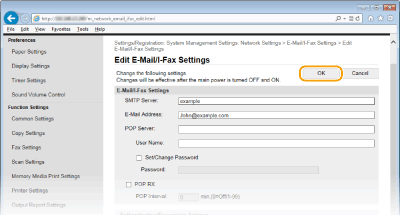
To add a sender name, please follow the steps below at the machine:
<Menu>  <Scan Settings>
  <Register Unit Name (E-Mail/I-Fax)>
  Enter the sender name
  <Apply>

I hope this information is helpful. If you need further assistance, please call us at 1-800-OK-CANON (1-800-652-2666).
- Mark as New
- Bookmark
- Subscribe
- Mute
- Subscribe to RSS Feed
- Permalink
- Report Inappropriate Content
12-28-2017 08:17 AM
Hi, I just bought a mf632Cdw, and I am trying to set up the scan to send by email to a GMAIL address.
I followed all the instructions of the forum but still did not work.
I don't know the port number i have to use, and the other specifications as well.
Can someone help me, thank you
- Mark as New
- Bookmark
- Subscribe
- Mute
- Subscribe to RSS Feed
- Permalink
- Report Inappropriate Content
01-14-2018 02:09 PM
I stumbled upon this forum post in my quest to enable scanning to email from my MF733Cdw via Google repeatedly in various search attempts with the prior steps not completely working, but knowing I was on the right track from these two replies (first to set the destinations through the wizard that uses the IP address, second to use the remote UI by IP address login as manager to set the TX email/ifax settings). It still wasn't working.
This video here would have been a big help, so to save others time: https://www.youtube.com/watch?v=bLygv3E0ODY.
You have to go under network from the remote UI and change the port to 587 AND be sure after saving that to go into the TX settings and only use the info precisely as shown in this video, not changing any more check boxes.
Also note my comment there on this video that gmail blocked the attempt(s) to use the smtp server, so I had to enable "less secure apps." Google emailed me asking me to review a blocked attempt to request access, and I had to cllck the allow link in the email which then brought me to a page to enable access to "less secure apps." I did, and it finally works.
- Mark as New
- Bookmark
- Subscribe
- Mute
- Subscribe to RSS Feed
- Permalink
- Report Inappropriate Content
01-14-2018 10:30 PM
very happy to finally had it done!
- Mark as New
- Bookmark
- Subscribe
- Mute
- Subscribe to RSS Feed
- Permalink
- Report Inappropriate Content
04-05-2018 04:29 AM
Hi alexandrenakao,
The scan to email feature is designed to scan to an email server and not a personal email address. With this said, the easiest way to do this is to scan from the MF Scan Utility and then select Save to PC instead of Attach to E-mail. Save the Scan to a location that you can find and bring up the scanned image for example from your C:/My Documents/My Pictures folder if that is where you choose to save it. From this point open up your email program and try attaching the photo/email etc by browsing to the location of where the scan was saved using your email attachment procedure from your email program.. Please click HERE for detail scanning instructions.
Also note that scan to email is designed to work with an on site email server such as an MS Exchange server or a Domino server and not offsite email servers such as Yahoo or G-Mail.
If you continue to have difficulties, please contact our support group using the following link:
http://Canon.us/ContactLI
11/20/2025: New firmware updates are available.
EOS R6 Mark III - Version 1.0.1
EOS R5 Mark II - Version 1.2.0
PowerShot G7 X Mark III - Version 1.4.0
PowerShot SX740 HS - Version 1.0.2
10/21/2025: Service Notice: To Users of the Compact Digital Camera PowerShot V1
10/15/2025: New firmware updates are available.
Speedlite EL-5 - Version 1.2.0
Speedlite EL-1 - Version 1.1.0
Speedlite Transmitter ST-E10 - Version 1.2.0
07/28/2025: Notice of Free Repair Service for the Mirrorless Camera EOS R50 (Black)
07/24/2025: New firmware updates are available.
07/23/2025: New firmware updates are available.
7/17/2025: New firmware updates are available.
05/21/2025: New firmware update available for EOS C500 Mark II - Version 1.1.5.1
02/20/2025: New firmware updates are available.
RF70-200mm F2.8 L IS USM Z - Version 1.0.6
RF24-105mm F2.8 L IS USM Z - Version 1.0.9
RF100-300mm F2.8 L IS USM - Version 1.0.8
RF50mm F1.4 L VCM - Version 1.0.2
RF24mm F1.4 L VCM - Version 1.0.3
01/22/2024: Canon Supports Disaster Relief Efforts in California
01/14/2025: Steps to resolve still image problem when using certain SanDisk SD cards with the Canon EOS R5 Mark II
Canon U.S.A Inc. All Rights Reserved. Reproduction in whole or part without permission is prohibited.


