Turn on suggestions
Auto-suggest helps you quickly narrow down your search results by suggesting possible matches as you type.
- Canon Community
- Discussions & Help
- Printer
- Desktop Inkjet Printers
- Pixma MG7520 Alignment Issues
Options
- Subscribe to RSS Feed
- Mark Topic as New
- Mark Topic as Read
- Float this Topic for Current User
- Bookmark
- Subscribe
- Mute
- Printer Friendly Page
Pixma MG7520 Alignment Issues
Options
- Mark as New
- Bookmark
- Subscribe
- Mute
- Subscribe to RSS Feed
- Permalink
- Report Inappropriate Content
10-23-2020 11:07 PM
Hi there! I wanted to try this as one last ditch attempt to maybe save my printer before having to accept I may need a new one.
I got this printer almost six years ago for college, used it a decent chunk the first year but not enough to justify moving it back and forth between cities, and haven't opened it until now since I have the space and won't be moving around as much for a bit. I got all new ink cartridges since most were out, did multiple cleanings, tried an auto head alignment, and attempted a manual head alignment, and I think the alignment is where my issue is.
Here is the print nozzle check after two deep cleans. I think the colors look great, the only thing I noticed was off is the PGBK is at a slight angle but I can see all the boxes normally for the most part.

Here however is where I see the issue:

I think this is from one of the auto head alignments, but I keep missing a huge chunk of black in the middle I believe. I read through some other forums and saw one where Canon suggested looking at the timing strip to see if there's grease and I couldn't find any. I don't know if this helps, but this was the last thing I printed, it was a print head alignment chart without performing any kind of alignment:

Is there anything else I can try and do to save my printer? It barely got moved besides the trip home after freshman year and I had no issues with it prior to packing up and moving home.
1 REPLY 1
Options
- Mark as New
- Bookmark
- Subscribe
- Mute
- Subscribe to RSS Feed
- Permalink
- Report Inappropriate Content
10-23-2020 11:33 PM - edited 10-23-2020 11:33 PM
We'd recommend trying to clean that encoder strip, even if it looks clean. Even the smallest speck of dirt, grease, or ink on it can adversely effect your print quality and result in things like what you noticed on those black boxes.
Description
Cleaning the encoder (timing) strip - MG5620 / MG6620 / MG7520
Solution
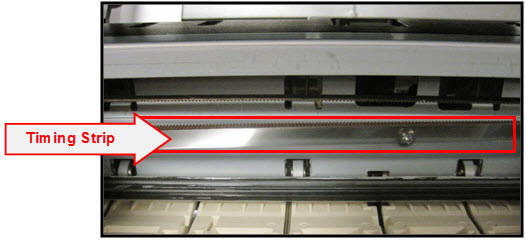
Click here to view an enlarged view of the timing strip.
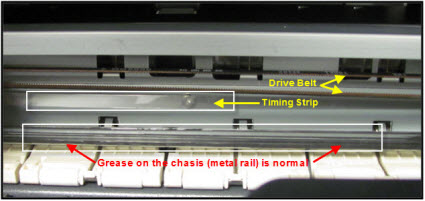
The timing strip is a clear, plastic strip approximately 1/4 inch in height positioned horizontally across the center of the unit, just in front of the carriage drive belt. The timing strip contains many thin black vertical lines that help determine the carriage position during operation.
During certain uncommon tasks such as the removal of a paper jam, it is possible to inadvertently touch a lubricated area on the printer's chassis causing a small amount of grease to be deposited onto the timing strip.
Grease on the timing strip may result in poor print quality including; mis-aligned or distorted characters, vertical lines or, in some cases, an inoperable error condition (such as 5100) or knocking / grinding noise.
In most cases, it is easy to remove the grease from the timing strip using common household items. If you wish, you may follow the steps below to remove the grease from the timing strip.
Items needed:
-Clean, unused cotton swab
-Small amount of Isopropyl Alcohol or window cleaner
-Flashlight or other light source
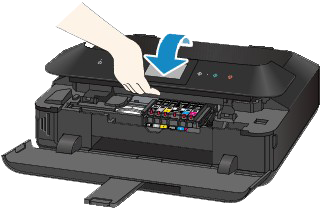
- Holding sides of the paper output tray, gently open it.
- Power on the printer then lift up and open the operation panel until it stops.
The Print Head Holder (carriage) will move to ink changing (center) position.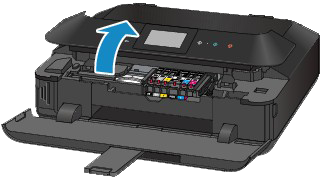
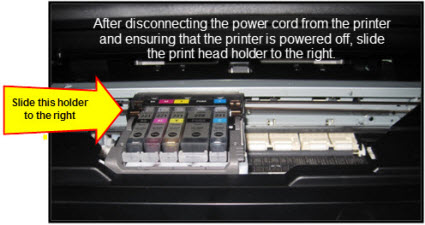
- With the operation panel open, unplug the power cord from the wall outlet or power strip. Be sure the printer's power LED is no longer illuminated.
This will allow you to easily slide the carriage left to right. Note:
Note:- When you move the print head holder, hold the top of the print head holder and slide it slowly to the right edge or the left edge.

- When you move the print head holder, hold the top of the print head holder and slide it slowly to the right edge or the left edge.
- Gently slide the carriage to the right side.
| Carriage is centered |
| Carriage is to the right |
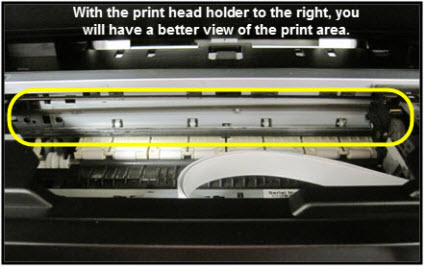
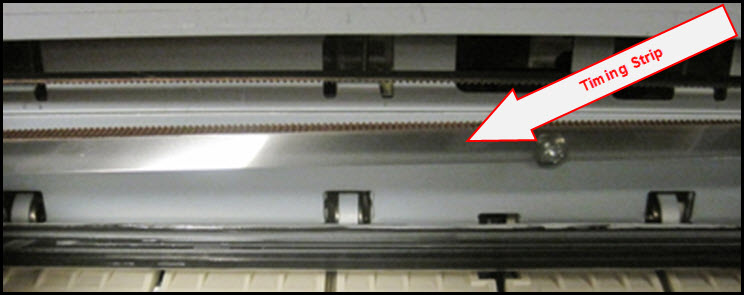
- Using a flashlight, carefully inspect the timing strip for grease that may have attached to the timing strip. It is helpful to view the timing strip from several angles as even a small amount of grease can impact print quality. Note: The timing strip is a clear strip located in front of the carriage drive belt.
- Moisten the cotton swab with Isopropyl alcohol and carefully remove the grease from the timing strip. To prevent further spreading of grease, be careful not to touch the chassis or other areas inside the unit which may contain grease from the factory. Note: If Isopropyl Alcohol is not available, you may use window cleaner solution.
 Important: Do not remove the grease on the chassis (metal rail).
- Once you have confirmed that the left and center portions of the timing strip are clean, gently slide the carriage all the way to the left.
- Repeat steps 4 & 5 for inspecting the right side of the timing strip until is completely free of grease and other matter.
- Gently close the operation panel.
- Reconnect the power cord and power on the printer.
(The indicator light blinks steadily while the printer initializes.) Note: After the printer is powered back on, you will receive a message on the printer's display that the printer was not properly turned off. Tap OK to clear the message and return the printer to standby mode.
- Confirm operation of the unit by printing a text document and photograph. Printing this document is a good test since it contains text and images. If print quality is still poor, repeat the above steps.
Enlarged Image
We hope this helps!

Announcements
05/13/2026: New firmware updates are available.
EOS R5 Mark II - Version 1.3.0
EOS R6 Mark II - Version 1.7.0
04/28/2026: Service Notice: Caution Concerning use of Lithium Batteries
03/17/2026: New firmware updates are available.
SELPHY CP1500 - Version 1.0.7.0
02/23/2026: New firmware update is available for EOS C50- Version 1.0.3.1
01/23/2026: New firmware update is available for RF 24-105mm F4 IS USM- Version 2.0.7
01/20/2026: New firmware updates are available.
12/22/2025: New firmware update is available for EOS R6 Mark III- Version 1.0.2
10/21/2025: Service Notice: To Users of the Compact Digital Camera PowerShot V1
10/15/2025: New firmware updates are available.
Speedlite EL-5 - Version 1.2.0
Speedlite EL-1 - Version 1.1.0
Speedlite Transmitter ST-E10 - Version 1.2.0
07/28/2025: Notice of Free Repair Service for the Mirrorless Camera EOS R50 (Black)
05/21/2025: New firmware update available for EOS C500 Mark II - Version 1.1.5.1
Related Content
- imagePROGRAF PRO-310 banding in Professional Photo Printers
- PIXMA TR4520 Alignment Issue...not fixable with print head alignment in Desktop Inkjet Printers
- PIXMA MX490 Print Head Alignment Issues in Desktop Inkjet Printers
- PIXMA TR4700 series: Text prints messed up, possible communication issues in Desktop Inkjet Printers
- PIXMA PRO-200 lines across image, colors don't match profile in Professional Photo Printers

Ⓒ 2026
Canon U.S.A Inc. All Rights Reserved. Reproduction in whole or part without permission is prohibited.
