- Canon Community
- Discussions & Help
- Camera
- EOS DSLR & Mirrorless Cameras
- Re: Color Problem with 5D Mark 3
- Subscribe to RSS Feed
- Mark Topic as New
- Mark Topic as Read
- Float this Topic for Current User
- Bookmark
- Subscribe
- Mute
- Printer Friendly Page
Color Problem with 5D Mark 3
- Mark as New
- Bookmark
- Subscribe
- Mute
- Subscribe to RSS Feed
- Permalink
- Report Inappropriate Content
08-28-2017 02:26 AM - edited 08-28-2017 02:34 AM
Hello!
New member here, so bear with me.
I am a portrait photographer, and recently upgraded from a 5D Mark 2 to a 5D Mark 3.. Despite advice from a friend, I took the Mark 3 to a shoot without practicing first. As as I shot, I was looking at the LCD playback screen, and thought they all looked wonderful. But once I got home, I quickly realized that I have a problem. I was not quite prepared for the drastic difference in color between the 2 and the 3. When I shot with my Mark 2, I never had an issue with color... and if I did, it was user error. But the color is awful in the images that I made with the new Mark 3.
I have Googled until my fingers were numb, so I joined the forum just so I could ask... Is there any way to correct this IN-CAMERA?!?! (And if not, what is the easiest way to correct the problem for any & all future RAW files that I shoot?)
I have tried changing picture styles. I have tried changing the Kelvin settings.. No matter what I do, the color looks "off". Please help me!!
I have attached some links to examples from the shoot. And while I'm well aware that there are probably "other" technical problems with the images, I ask that you only look at the image color(s) as the problem. (For what it's worth.. I know the location is not the issue, because I shot in the very same location with my Mark 2, and the colors were lovely. But in the photos below, as you'll see, there's an over-abundance of green.)
https://ibb.co/eYyNGk
https://ibb.co/hN6W95
Image details.. 6850 Kelvin (which, btw, is not what it said in-camera as I was shooting) with +5 magenta
And yes, I shot these in RAW.
Thanks for any and all advice/tips/suggestions you might have!
Best,
-Dusty
- Mark as New
- Bookmark
- Subscribe
- Mute
- Subscribe to RSS Feed
- Permalink
- Report Inappropriate Content
08-02-2018 04:22 PM - edited 08-02-2018 04:24 PM
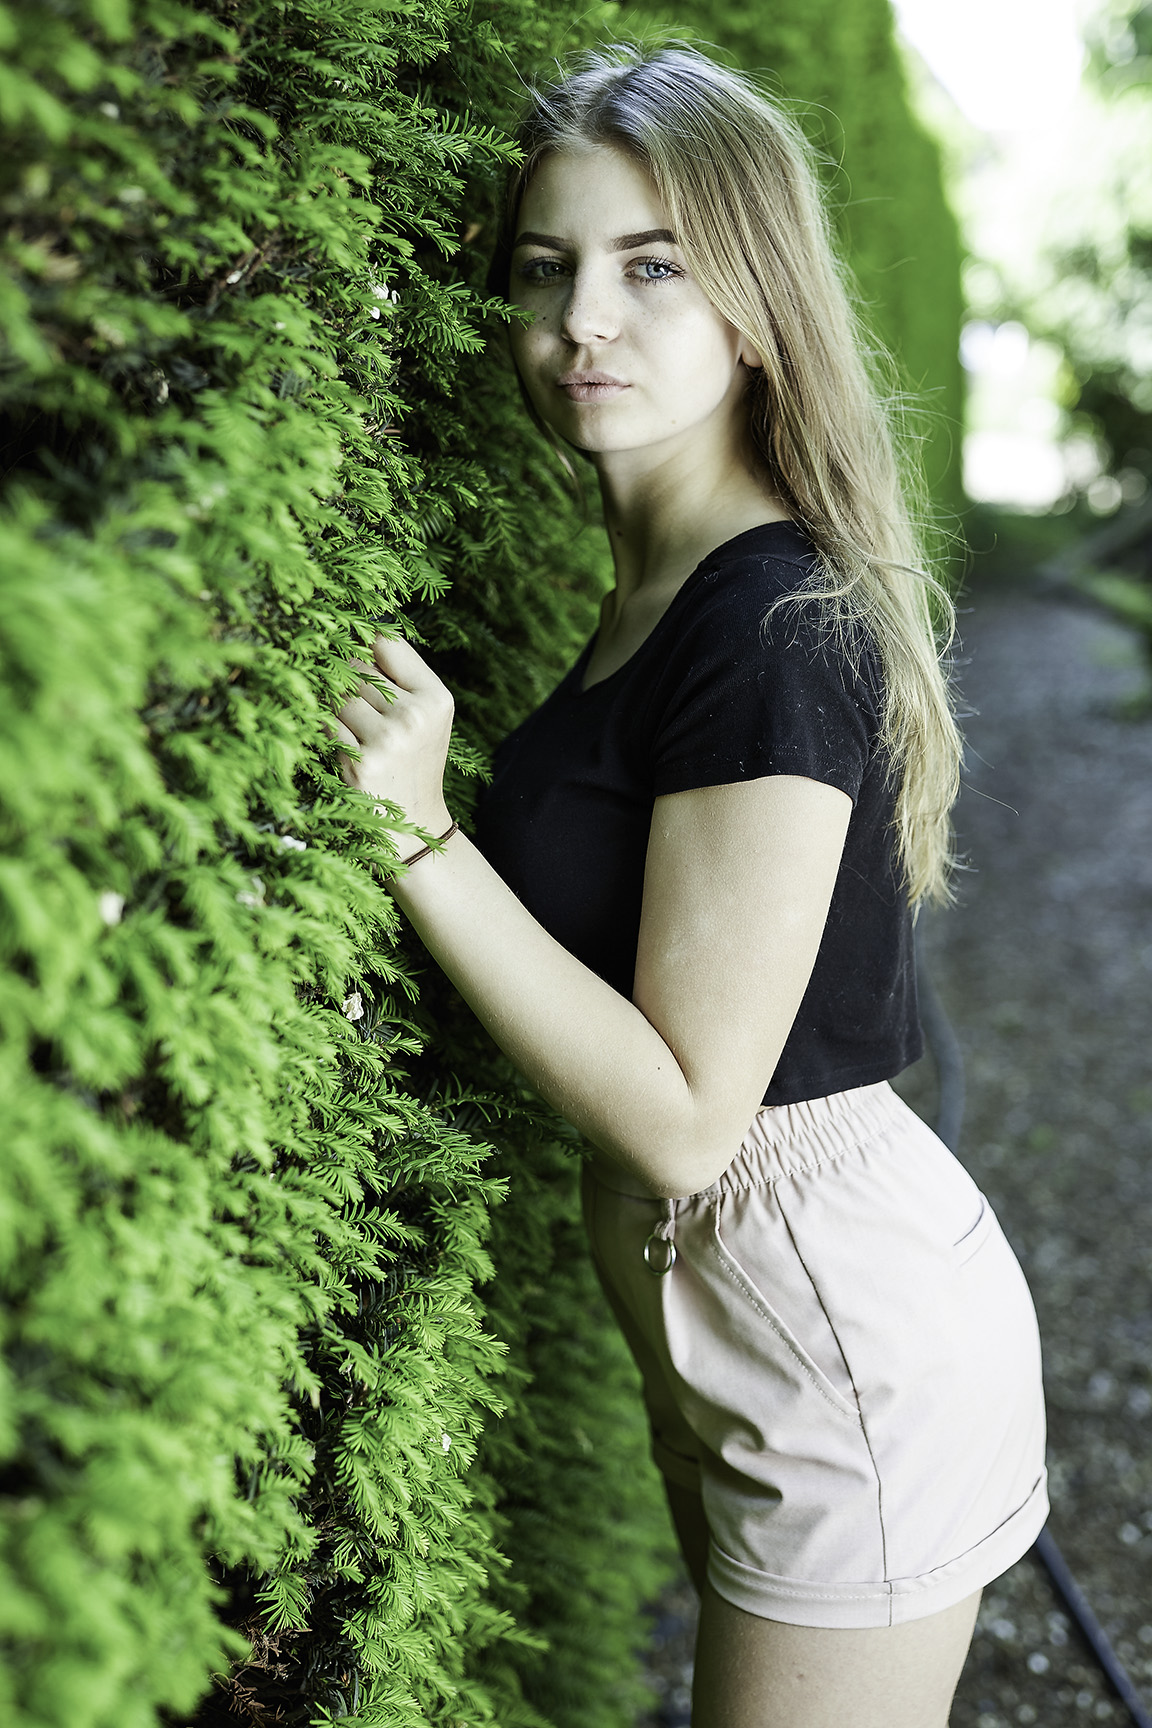
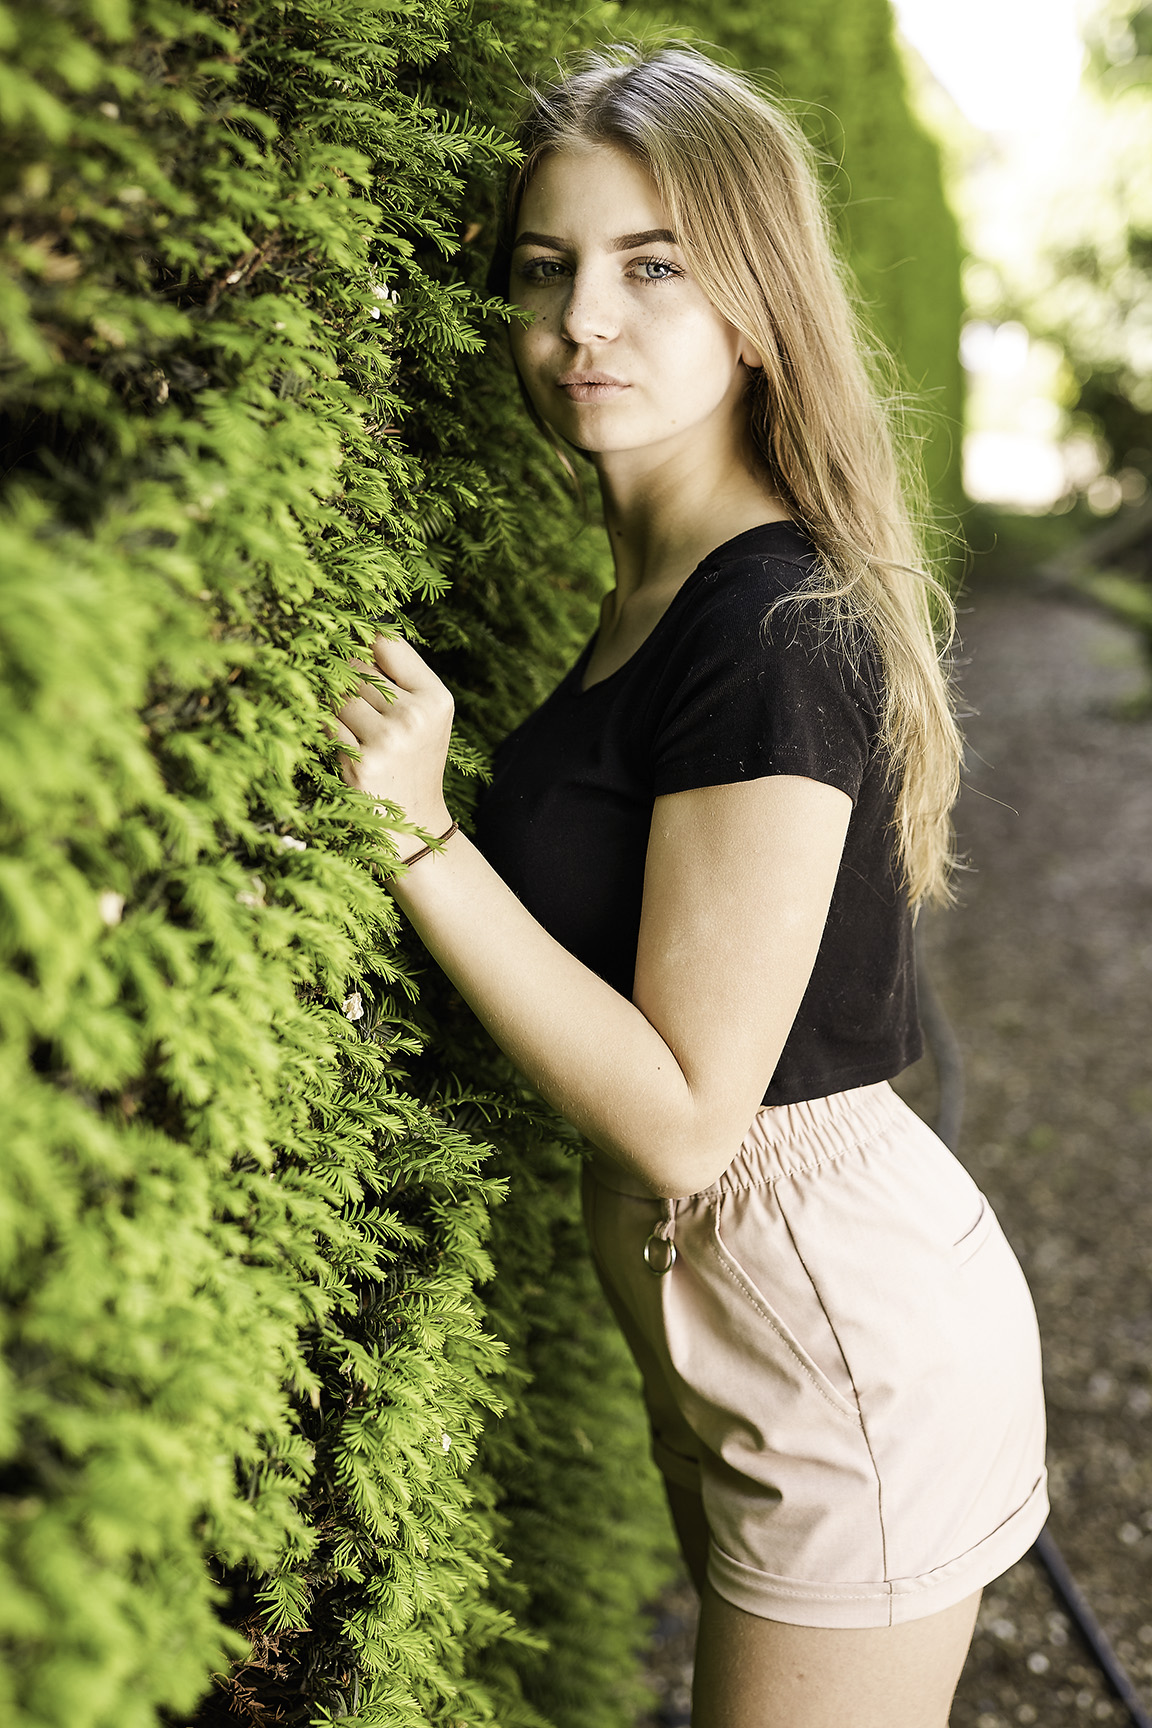
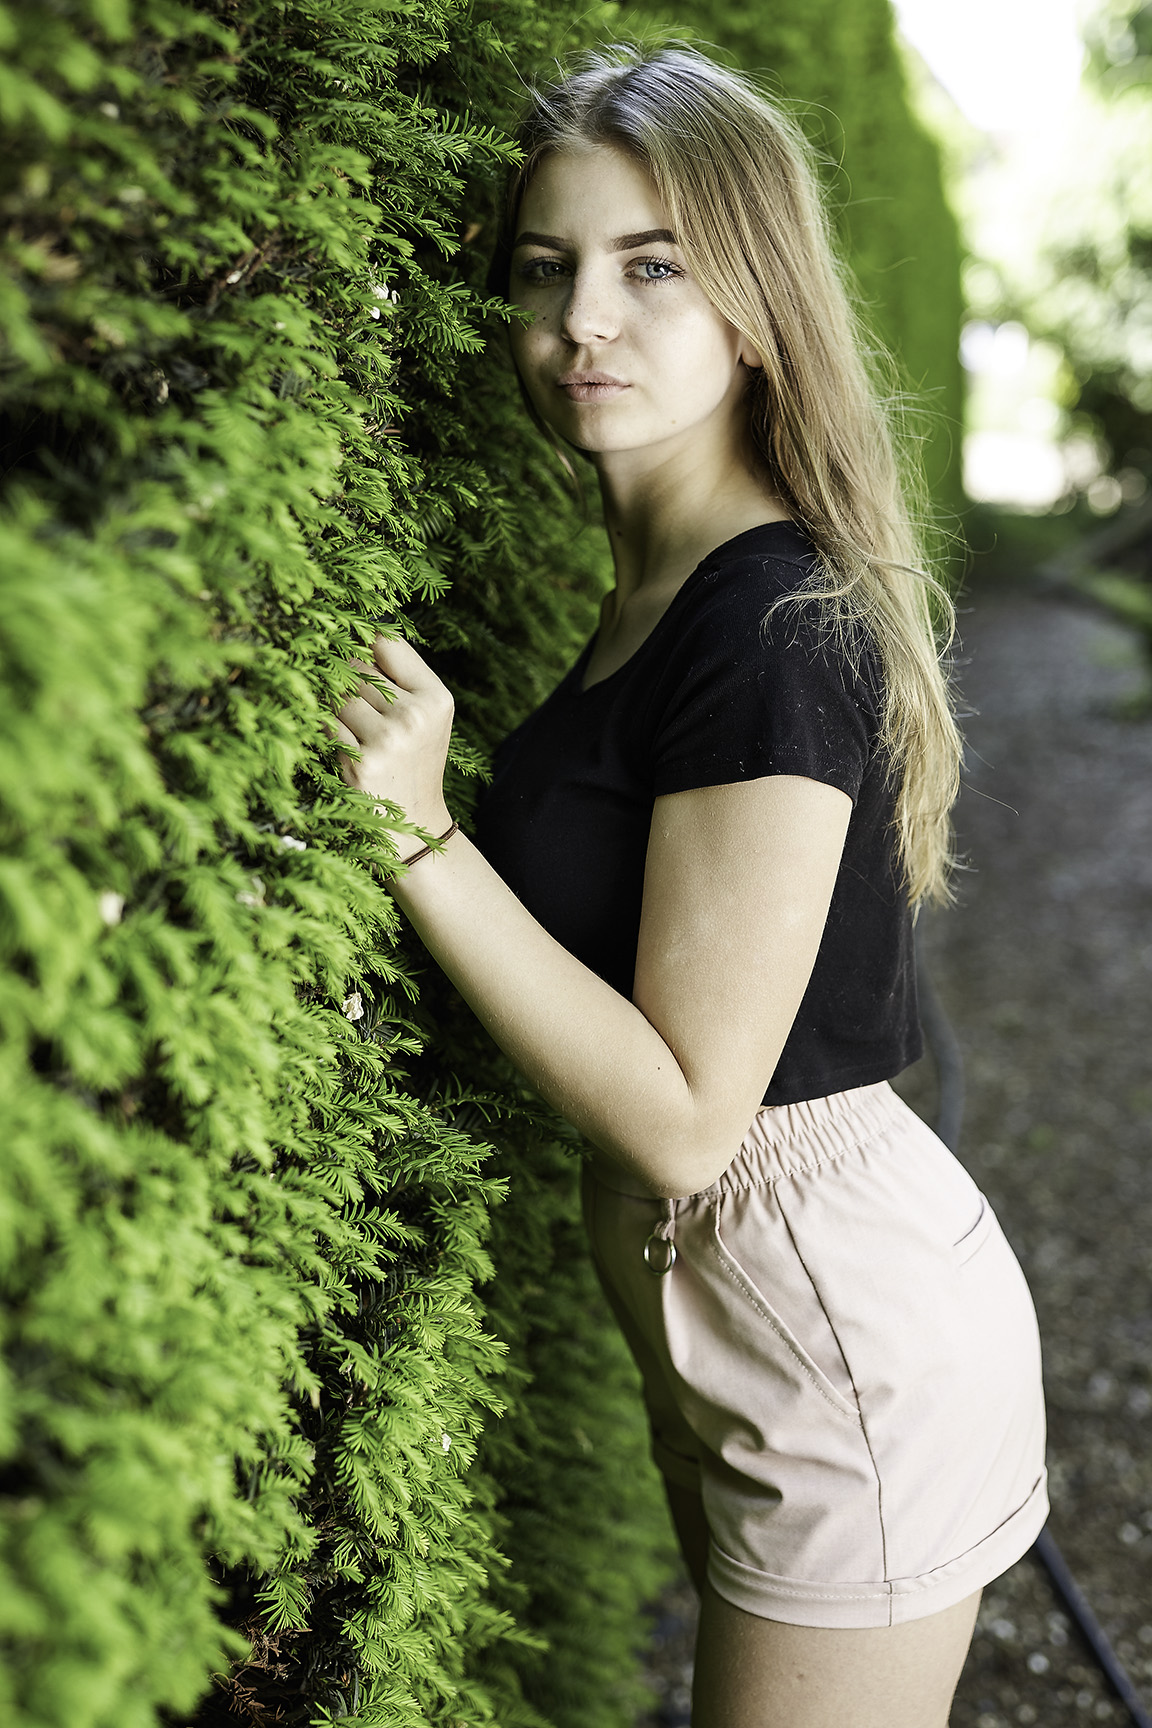
In the top photo the skin tones are realistic, the bottom one clearly has a green tint to the model's skin.
I am just using a Samsung monitor with no special profiling.
And it is not an opinion, it is a fact.
(Maybe you can use the color tool to look at the color values in the white of her eyes - the only neutral tone I can see on the image.)
- Mark as New
- Bookmark
- Subscribe
- Mute
- Subscribe to RSS Feed
- Permalink
- Report Inappropriate Content
08-02-2018 04:26 PM
"That's why I need some help and want to find a solution for me"
And, this is exactly what we will endeavor to do so hold on tight!
Right off the top photo is correct. The bottom one is junk. Now let's try to figure out why.
If your monitor is off as one poster suggests let's take care of that right now. If on a Windows machine, Mac has similar adjustments, look at your grayscale. That is the single most important thing to have correct. You have the ability to adjust it as is. You do not need any additional software or gadgets. Secondly, the the brightness and contrast again adjustable in Windows. Most people set their monitors too bright.
All post editors do their own thing. LR, DPP4 or Capture One, which you should probably switch to LR/PS, are all different in how they interpret a Raw file. Canon does not document its Raw files. Nobody else knows how Canon does it. It is not even the same for any given camera in the Canon line of cameras. A 6D could be different than a 6D Mk II for instance. But all 5D Mk III's are identical, all 1Dx Mk II's are identical, etc.
All post editors read the metadata tag file embedded in the Raw file. They use that to create an image that can be displayed on a computer monitor. The metadata tag is read from the settings you did in your camera. But they are not part of nor do they alter the original Raw file. The big advantage of Raw is the greater range of adjustments. This is due to the fact a jpg deletes actual data to compress the file as it process it. The real bad part is that data is lost forever. It can not be recovered.
"...where the white balance was set from the lump of the bright pice of model shorts .."
This was a poor choice. Especially when you had a good place in the gravel to the right of her back. Le me show you.
First this is her shorts used as a grayscale adjustment point in ACR.
This is using her shirt fo rgrayscale.
And last, using the gravel behind her back.
On my monitor this looks correct. But are you beginning to understand how this works? She is a lovely young lady, BTW.
If you are truly wanting to get into professional looking photography I strongly suggest you get LR and or PS, better yet, get both. Capture One and actually all the rest are for amateurs.
EOS 1DX and many lenses.
- Mark as New
- Bookmark
- Subscribe
- Mute
- Subscribe to RSS Feed
- Permalink
- Report Inappropriate Content
08-02-2018 04:40 PM
"Your pictures of people on Flickr have so vivid colors and I like it very much."
OK, number two big warning if you are after lifelike shots. Over saturated photos of things, man made and perhaps flora and fauna look good. People on the other hand look like comic book characters if you go too far. The old adage, less is more applies here. A little is good but a lot is not.
EOS 1DX and many lenses.
- Mark as New
- Bookmark
- Subscribe
- Mute
- Subscribe to RSS Feed
- Permalink
- Report Inappropriate Content
08-02-2018 04:59 PM
@TCampbell wrote:You're camera doesn't look like it has a problem. The camera wont produce an image that looks like the first photo if shot in RAW and using neutral "daylight" balanced lighting. It appears to be either processed to look like this, or the lighting wasn't neutral. (you can post the actual .CR2 file to dropbox if you want us to look at the real data).
Here you go link to orginal raw file:
@TCampbell wrote:You're camera doesn't look like it has a problem. The camera wont produce an image that looks like the first photo if shot in RAW and using neutral "daylight" balanced lighting. It appears to be either processed to look like this, or the lighting wasn't neutral. (you can post the actual .CR2 file to dropbox if you want us to look at the real data).
You mentioned: "After every photo session, there is always nightmare to me getting right colors in my photos. "
What software are you using to process your RAW images?
I use Capture One for post processing my photos
@TCampbell wrote:
This means that when you import your photos, the RAW workflow software auto-applies to the camera profile to every image upon import. Since a camera profile can't possibly know about any local conditions (e.g. color cast in the lighting that needs a white balance tweak, etc.) you always have to do a mild tweak to the reference frame, but you "sync" those changes to the rest of the shoot. You don't actually tweak each image one-by-one.
That is what I wanted the Capture One is doing for me, because I usualy have series of photo shoots to work with.
Thanks for helping me. I'm reading every hints from everyone here and just make my own conclusions.
- Mark as New
- Bookmark
- Subscribe
- Mute
- Subscribe to RSS Feed
- Permalink
- Report Inappropriate Content
08-02-2018 05:51 PM
@kacprek wrote:
Thanks for you opinion 🙂 But in the real world the hedge was not so green yellow as on the first photo and the white balance in camera is set to sunny day as I said although I was shooting in shadowed place. Maybe your right the picture is to much green and blueish now but this is wb just from the picker. What kind of display do you use to watch my photos?
When using the picker to set white balance, it's important to find something that is meant to be "neutral" in real life. Neutral means the amount of cyan, magenta, and yellow are perfectly equal such that the result is a perfect "gray" with no color cast.
Typically you use something that is unquestionably known to be a perfect neutral "gray" such as a photographic gray card that can used as the target for the picker (it only needs to be shown in one reference frame).
If you try to just pick something in the scene, often the object isn't truely color neutral and you can get poor results. Unfortunately there's really nothing suitable to use as a white-balance picker target in that image.
While technially "white" can be used for white balance (e.g. a sheet of white printer paper)... white is easy to over-expose and if that happens, you can get the illusion of having balance because one or more color channels may have clipped. A middle-gray target card is preferred because it's unlikely to be clipped if using a correct exposure.
But I do agree with diverhank in that I suspect your monitor is probably not correctly color-calibrated. I use calibrated displays (via an X-Rite "ColorMunki") and the colors in your model on the adjusted image are quite strongly green (the model has skin with a rather strong green color cast -- making her appear very sickly.)
Don't feel badly... I made the same mistake myself.
Before I bought a calibration tool to fix my display, I used to think it was accurate ... but everyone else would comment that things had a rather strong orange color cast. I thought they were just being fussy. One day someone showed me one of my images (from my Flickr account) displayed on his monitor. It was very strongly tangerine orange.
I tried some self-calibration techniques (being too cheap to buy the tool). That didn't work. I finally broke down and brought the tool to calibrate my displays and I'm much happier for it. Finally colors are bang-on accurate.
I think you'll really be amazed at the results (and much happier) once you get your displays properly color calibrated.
There are less-expensive versions of color calibration tools that only calibrate monitors. There are more expensive versions that can also calibrate printers, projectors, scanners, and other products that require color accuracy.
If you were shooting products where color accuracy is important (e.g. fashioin), there are calibration tools that can sample the color of fabric and then match that to the output to guarantee that product photos show bang-on accurate color.
Those calibration tools cost a little more than the tools that only calibrate monitors.
X-Rite and DataColor are the two big names in color calibration tools.
5D III, 5D IV, 60Da
- Mark as New
- Bookmark
- Subscribe
- Mute
- Subscribe to RSS Feed
- Permalink
- Report Inappropriate Content
08-02-2018 06:23 PM
@kacprek wrote:
Your pictures of people on Flickr have so vivid colors and I like it very much. What do you do to obtain such so vibrant colors on your photos?
Not sure if this applies to me but I have a tendency to like more vivid pictures so I'm a bit heavy handed on the colors (a tad high on vibrancy (25) and saturation (10) on Photoshop) but I'm slowly weening myself off of that. For portraits, I prefer a tad on the warm side and that's why I thought your RAW out of the box images look really nice, requiring very little correction. I agree with ebiggs and others that one should go easy on colors esp. saturation for portraits.
Diverhank's photos on Flickr
- Mark as New
- Bookmark
- Subscribe
- Mute
- Subscribe to RSS Feed
- Permalink
- Report Inappropriate Content
08-02-2018 06:33 PM
But first the colors stil don't looks as I would wish and it's because as I ealier said the wrong white balance was set in camera for the shadowed place like this and it doesn't matter it's raw file, the right colors are lost because wrong white balance setting (this is my theory from my expirience)
And second. Do you have some permanent preset set by default in your Lightroom, because I'm sure the other sliders are moved in Lightroom as well (color saturation, clarity, sharpening, exposure and vibrance, quite a lot setings). From the original pictures in the white balance settings there is only tint moved to +1
Last question from which part of the gravel you picked up the greyscale and what is the determinant of that choice (equal values or something else)?
Thank you so much that you spent a bit of your time to help me ebbigs
- Mark as New
- Bookmark
- Subscribe
- Mute
- Subscribe to RSS Feed
- Permalink
- Report Inappropriate Content
08-02-2018 06:37 PM
Most photographers do not know the difference between vibrance and saturation. Here goes..........
Saturation is a uniform increase in the intensity of all colors. It just multiplies whatever is there all over. This can result in clipping. It will over saturate skin tones which you do not want. Makes them look orangeish and unnatural.
Vibrance on the other hand looks at and increases the intensity of the more muted colors. It does nothing to very little to the already well-saturated colors. Vibrance is better for skin tones. It won't let them be overly saturated and unnatural looking.
EOS 1DX and many lenses.
- Mark as New
- Bookmark
- Subscribe
- Mute
- Subscribe to RSS Feed
- Permalink
- Report Inappropriate Content
08-02-2018 08:32 PM
"...the wrong white balance was set in camera ..."
You are still not understanding. WB in a Raw file is meaningless. It can be set anywhere you like. Raw files contain only luminous info. Nothing else. The WB that is used for display is taken from the camera but it is meaningless.
"Do you have some permanent preset set by default in your Lightroom..."
I opened your jpg in ACR not LR and didn't make any additional edits except WB by selecting different areas. Look at the gravel right to the right of her back. There are several spots that are petty close to 18% gray. Choosing her shorts was a mistake so don't choose areas like that anymore.
EOS 1DX and many lenses.
- Mark as New
- Bookmark
- Subscribe
- Mute
- Subscribe to RSS Feed
- Permalink
- Report Inappropriate Content
08-02-2018 08:37 PM
"The most adequate color toning that I like is third photo for me either."
Does this mean you like #3 the best? You should as it is the most accurate. It could still stand a few tweaks but it is very close as is. I don't agree with Tim about not having gray in most photos to use as a WB starting point. Most, again most, note I did not say all Tim, scenes will have something that is near 18% gay.
EOS 1DX and many lenses.
03/17/2026: New firmware updates are available.
SELPHY CP1500 - Version 1.0.7.0
02/23/2026: New firmware update is available for EOS C50- Version 1.0.3.1
01/23/2026: New firmware update is available for RF 24-105mm F4 IS USM- Version 2.0.7
01/20/2026: New firmware updates are available.
12/22/2025: New firmware update is available for EOS R6 Mark III- Version 1.0.2
11/20/2025: New firmware updates are available.
EOS R5 Mark II - Version 1.2.0
PowerShot G7 X Mark III - Version 1.4.0
PowerShot SX740 HS - Version 1.0.2
10/21/2025: Service Notice: To Users of the Compact Digital Camera PowerShot V1
10/15/2025: New firmware updates are available.
Speedlite EL-5 - Version 1.2.0
Speedlite EL-1 - Version 1.1.0
Speedlite Transmitter ST-E10 - Version 1.2.0
07/28/2025: Notice of Free Repair Service for the Mirrorless Camera EOS R50 (Black)
7/17/2025: New firmware updates are available.
05/21/2025: New firmware update available for EOS C500 Mark II - Version 1.1.5.1
- Canon G7 X MARK III - catastrophic power failure after 6 uses in Point & Shoot Digital Cameras
- Depth of field for video loss of sharpness with EOS 70D, 18-55 zoom lens in EOS DSLR & Mirrorless Cameras
- EOS R5 Mark II Trouble focusing with Godox flash attached in EOS DSLR & Mirrorless Cameras
- Focus problem for EOS R5 Mark II and 200-800 lens in EOS DSLR & Mirrorless Cameras
- 70-200 (EF lens with adapter) AF not working on R6 Mark II body. in EF & RF Lenses
Canon U.S.A Inc. All Rights Reserved. Reproduction in whole or part without permission is prohibited.


