- Canon Community
- Gallery
- Share Your Photos
- R5 Focus Stacking - DPP 4 vs Helicon Focus Process...
- Subscribe to RSS Feed
- Mark Topic as New
- Mark Topic as Read
- Float this Topic for Current User
- Bookmark
- Subscribe
- Mute
- Printer Friendly Page
R5 Focus Stacking - DPP 4 vs Helicon Focus Processing
- Mark as New
- Bookmark
- Subscribe
- Mute
- Subscribe to RSS Feed
- Permalink
- Report Inappropriate Content
04-02-2023 04:23 AM - edited 04-03-2023 07:21 PM
I was testing out the 1.8.1 IBIS pixel shifting feature the other night and thought it a good opportunity to do some stacking. Some people are confused about the "Focus increment" (FI) setting. Here it is in a nutshell... It determines the distance your focal plane travels. Now, the camera isn't going to tell you that distance so it's up to you as a photographer to know how deep your depth of field is at the given aperture and distance to get the proper overlap. I like to keep my focal planes fairly tight so that the sharpest parts of my DOF are captured and overlap with the sharpest parts of the next focal planes DOF... Make sense? This means that I set my FI to a low number, like 2 or 3 and depending on how big my subject is determines how many shots I take. You can make the FI larger and use fewer shots, then set a larger radius when processing, radius expands how far the program reaches to get pixels to include in the stack. The problem with this is it will pull in pixels that are in the extremities of acceptable focus in the DOF. Still with me? OK. Getting firm control of focus stacking in the R5 and DPP 4 is hard to do because it is very basic and simplistic compared to dedicated stacking programs like Helicon. BTW, Helicon Focus and Helicon Remote cost me $200 about 4 years ago for a lifetime license and upgrades. Helicon Remote, on a computer, tethers to your camera and gives you a full screen live view and allows you total control of the camera. You set a focus start point, focus ending point, all of your exposure settings, and it will calculate the number of shots based on your radius or other settings or you can override that. After capture, it will then store your Raw on the camera or send them to your PC and open Helicon Focus. OK, enough of the Helicon advertisement.
TBH, if you get your camera setup right, DPP 4 does an excellent job as you can see in my comparison. I actually like the ability to edit my Raw files in DPP 4. I edit a file, copy the recipe, then batch paste to all shots, and finally send the edited Raw files to the Depth Compositing tool to be stacked. But be forwarded, DPP 4 is slowwwww during the whole process, especially with a large stack. These are 90 shot stacks and it took DPP 4 1.5 hours to process this image. It took Helicon Focus 10 minutes.
90 shot stack, Raw shots edited and processed in DPP 4. 1/400th, f/2.8, ISO 640, lighting was an LCD LED panel with diffuser.

90 shot stack, Raw shots processed in Helicon Focus and exported as DNG then edited in PaintShop Pro Ultimate 2023. 1/400th, f/2.8, ISO 640, lighting was an LCD LED panel with diffuser.
Newton
- Mark as New
- Bookmark
- Subscribe
- Mute
- Subscribe to RSS Feed
- Permalink
- Report Inappropriate Content
04-02-2023 05:21 AM
Hi, the examples look pretty detailed. I've never heard of the program you're talking about. I went through the web page and saw the examples. It will be exciting to put some thought into this.
Thanks for sharing.
- Mark as New
- Bookmark
- Subscribe
- Mute
- Subscribe to RSS Feed
- Permalink
- Report Inappropriate Content
04-02-2023 07:35 AM
The DPP version definitely has more detail. I wonder if that's the benefit of the longer processing time?
Ricky
Camera: EOS R5 II, RF 50mm f/1.2L, RF 135mm f/1.8L
Lighting: Profoto Lights & Modifiers
- Mark as New
- Bookmark
- Subscribe
- Mute
- Subscribe to RSS Feed
- Permalink
- Report Inappropriate Content
04-02-2023 08:15 AM
Very interesting. Thanks for posting Newton.
Conway, NH
R6 Mark III, M200 (converted to infrared), RF lenses, Pixma PRO-100, Pixma TR8620a, Lr Classic
- Mark as New
- Bookmark
- Subscribe
- Mute
- Subscribe to RSS Feed
- Permalink
- Report Inappropriate Content
04-02-2023 11:46 AM
Newton,
👍
Awesome post.
~Rick
Bay Area - CA
~R5 C (1.1.2.1), ~R50v (1.1.1) ~RF Trinity, ~RF 100 Macro, ~RF 100~400, ~RF 100~500, ~RF 200-800 +RF 1.4x TC, BG-R10, 430EX III-RT ~DxO PhotoLab Elite ~DaVinci Resolve Studio ~ImageClass MF644Cdw/MF656Cdw ~Pixel 10 ~CarePaks Are Worth It
- Mark as New
- Bookmark
- Subscribe
- Mute
- Subscribe to RSS Feed
- Permalink
- Report Inappropriate Content
04-02-2023 04:09 PM - edited 04-02-2023 04:32 PM
@rs-eos wrote:The DPP version definitely has more detail. I wonder if that's the benefit of the longer processing time?
I agree. More than likely it's my DNG editing skills in PSP or PSP's handling of DNG. This is my first attempt at exporting DNG from Helicon and PSP is the only program I have that will edit them. LR or PS would probably do a better job of it. I need to revisit this stack with Helicon and export tiff then edit. Normally, all my edits are done in DPP as my editing needs for wildlife are pretty simple, I use a light touch which is my preference.
Thank you for the feedback, excellent as usual 🙂
Here is another example/comparison done with the R6 and EF 100mm f/2.8L macro. [EDIT] This flower is one of the Fleabane varieties (I can't tell them apart, probably Daisy Fleabane) and the flower is about the size of a dime. Unlike the rose that filled my sensor, I had to crop this one.
60 shot stack. Raw files edited and stacked in DPP. 1/25th, f/6.3, ISO 1000

Stacked SOOC in Helicon, exported as tiff, and edited in DPP.
Newton
- Mark as New
- Bookmark
- Subscribe
- Mute
- Subscribe to RSS Feed
- Permalink
- Report Inappropriate Content
04-02-2023 04:36 PM
Yea, agreed that these are virtually identical. The only difference I see is that the background elements are more blurred in the Helicon image. Which personally I prefer.
Good to know though that both approaches are capable of the same level of detail.
Ricky
Camera: EOS R5 II, RF 50mm f/1.2L, RF 135mm f/1.8L
Lighting: Profoto Lights & Modifiers
- Mark as New
- Bookmark
- Subscribe
- Mute
- Subscribe to RSS Feed
- Permalink
- Report Inappropriate Content
04-02-2023 08:57 PM - edited 04-02-2023 09:05 PM
Focus stacking can be frustrating and to get it in one go, things have to be just right, like your angle to the subject, f/stop, lighting, etc., kind of like any other single image you capture, and frankly, due to the nature of compositing all of these images, artifacts are still introduced no mater how well you set up the shot. So to really get great results you have to take it a step further in post using the rendering programs "Retouching" (in Helicon Focus) or "depth compositing edit tool" (in DPP 4). See attached.
The way this works is, once you activate retouching you are presented with the final rendering (in the right pane) and a film roll along the bottom containing all of the images used to make the stack. You pan around the finished rendering until you find an artifact, blemish, or out of focus area, then scroll through the film roll until you find the actual frame of that area, which you will then see in the left pane. Then you brush the sharp part of the left pane onto the original in the right pane (your brush will show in both panes). You do have to specify a brush size and blur radius, and depending on how accurate you want to be, it can be a challenge.
These are screen grabs of the retouching tool in DPP 4, before and after retouching. My capture tool wouldn't pick up the retouching brush... Sorry 🙂
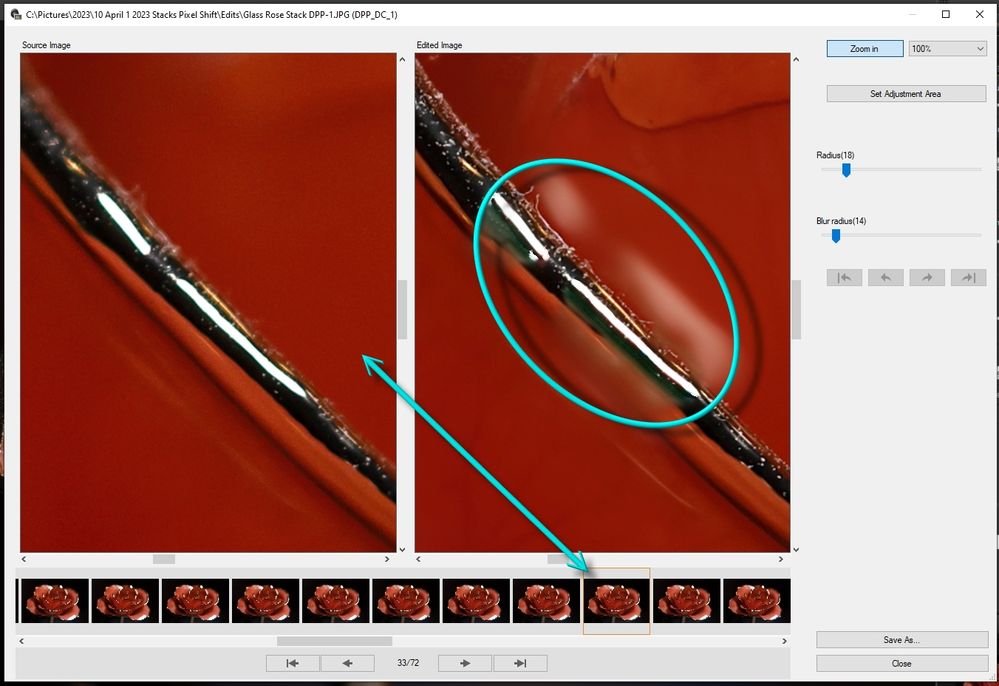

I sure hope this helps anyone just getting started with this technique 🙂
Newton
- Mark as New
- Bookmark
- Subscribe
- Mute
- Subscribe to RSS Feed
- Permalink
- Report Inappropriate Content
04-02-2023 11:38 PM
@ata wrote:Hi, the examples look pretty detailed. I've never heard of the program you're talking about. I went through the web page and saw the examples. It will be exciting to put some thought into this.
Thanks for sharing.
You are welcome. They used to have a free trial, but it was JPeG only. They have a somewhat active forum, so you can read some comments that may help you decide. The owners actually reply to questions and rarely is a problem not solved.
Newton
- Mark as New
- Bookmark
- Subscribe
- Mute
- Subscribe to RSS Feed
- Permalink
- Report Inappropriate Content
06-13-2024 10:08 PM
AWESOME!!
Canon U.S.A Inc. All Rights Reserved. Reproduction in whole or part without permission is prohibited.

