- Canon Community
- Discussions & Help
- Camera
- EOS DSLR & Mirrorless Cameras
- Business trying to take product pictures, turning ...
- Subscribe to RSS Feed
- Mark Topic as New
- Mark Topic as Read
- Float this Topic for Current User
- Bookmark
- Subscribe
- Mute
- Printer Friendly Page
Business trying to take product pictures, turning out dark
- Mark as New
- Bookmark
- Subscribe
- Mute
- Subscribe to RSS Feed
- Permalink
- Report Inappropriate Content
05-04-2015 12:19 PM
Let me preface this by saying no one who works here has had experience with photography and any guidance would be much appreciated.
We just got the Rebel t5i to help us get better pictures of our instruments and other merchandise for our website. I've spent 3 days reading about all the various settings of the camera (ISO, shutter speed, exposure, aperature, filters, lenses) and different lighting options.
The set up we currently have is as follows:
4 par 64 lighting cans with diffusing gels, (2 on an 10 ft. adjustable tree stand, the other 2 on individual adjustable stands) charcoal backdrop. It is important to note that we have this set up in a corner of the store so we're working with being able to light from the front, 1 side and above.
We're having a few problems.
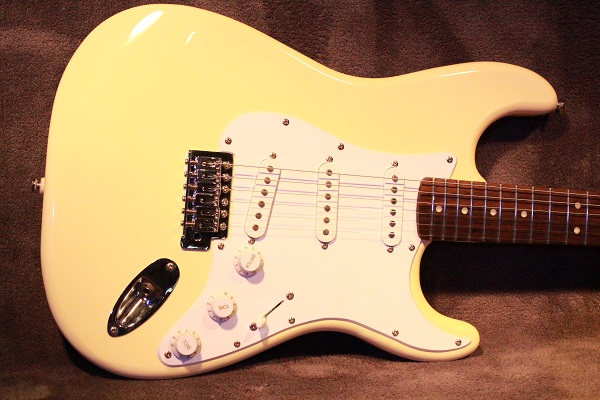
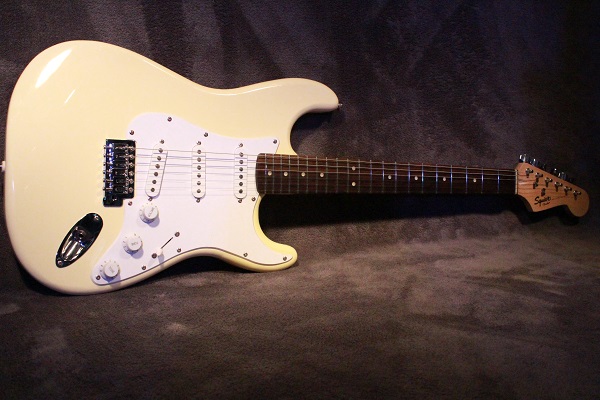
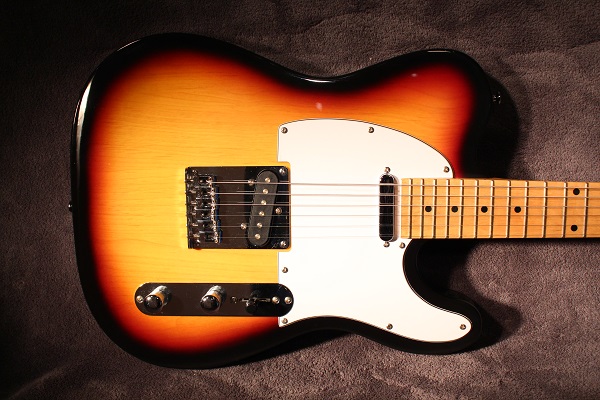
(This is after much trial and error with settings. The best one I was able to find was on Manual mode, 1/250 shutter speed, f 5.6, iso 800, aeb exposure and tungsten filter to help with the yellowing due to the florescent light)
1. We can't get the camera to produce an accrate color profile of the items consistently. In the first picture, you can see that the color is more yellow and it's even distorting around the edges. The second picture is more accurate in terms of what the color looks like in natural light but we were never able to get that when we were shooting the guitar closer up.
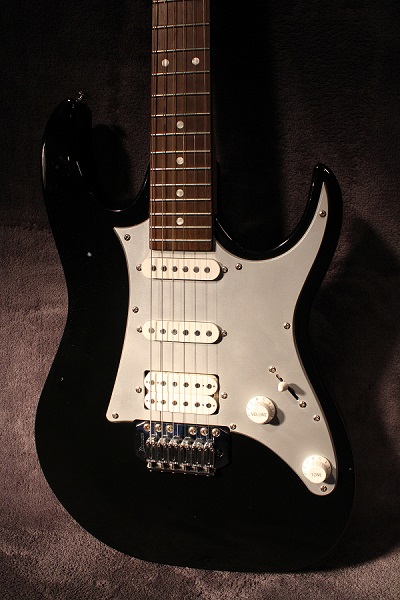
2. For black guitars or guitars with black edges, we're losing the edges no matter what we try to do with the lighting.
Do we need more light? or just the light we have being reflected better? different lense on the camera? Any advice would be seriously appreciated!
Thanks in advance.
Jamie
Kentucky Music Company
- Mark as New
- Bookmark
- Subscribe
- Mute
- Subscribe to RSS Feed
- Permalink
- Report Inappropriate Content
05-04-2015 12:57 PM
The color and direction of the light source matter; the colors of objects from which light can reflect onto the subject, matter; unwanted reflections matter (and can be hard to avoid); the color of the background matters (a black guitar won't show up against a black background, no matter what you do); equipment matters, but even the best equipment has to be correctly used; etc.; etc.; etc.
Product photography is difficult. If someone told you it isn't, go back and remind him that he forgot to tell you how to do it the easy way. The experience of learning by trial and error, with or without our advice, could be valuable to you and your associates. But to a business, time is money (as I'm sure you well know); and you might be better off hiring a profeessional photographer for a few hours to analyze what you're doing wrong and help get you on the right track.
Philadelphia, Pennsylvania USA
- Mark as New
- Bookmark
- Subscribe
- Mute
- Subscribe to RSS Feed
- Permalink
- Report Inappropriate Content
05-04-2015 01:02 PM - edited 05-04-2015 01:12 PM
I Agree. That was my suggestion as well. I think we've gone about as far as we can go with our knowledge but I think we've got enough together that a professional could come in and help us get a working setup relatively easy.
And thanks for the quick reply!
- Mark as New
- Bookmark
- Subscribe
- Mute
- Subscribe to RSS Feed
- Permalink
- Report Inappropriate Content
05-04-2015 02:07 PM
Gels don't "diffuse" -- they merely change the color of the light. Sometimes you change the color for an effect (e.g. light a neutral background with a colored "gel" and put a different light on the subject.
For example... if your background were farther away and a neutral "white" then you could dedicate a light to the background with a colored gel so that the background color always complements the product color (complementary colors can usually be found by using a color wheel). This basically gives you the ability to make your background any color you want without physically changing the background.
Another good reason to put some distance between product and background is to create better separation of the product. The edges of the product can now pick up reflections that you can control and you wont have a black against black problem that you're having here. It also allows the background to fall outside the depth of field (the range at which things appear to be nicely focused) -- this allows you to deliberately blur the background and yet have a tack-sharp subject for even better subject isolation.
I can see the shadows are casting hard edges on the background -- which isn't a good look. When we talk about "diffusing" a light, what we really mean is that we make the shadows edges soft and gradual. If light originates from a pin-point source, you get a well-defined shadow. It has a hard edge. E.g. when you stand outside on a sunny day and look at your own shadow, you can see the shape of your body on the ground because that's considered a pin-point light source (the sun's angular diameter is only about 1/2º from edge to edge.) If, on the other hand, you shoot the light through a very broad diffusing material (such as a "shoot through" umbrella which has a diameter several feet across, NOW the light appears to originate from the entire surface area of the fabric on the umbrella. That nice broad light source means you don't get shadows with hard edges... instead things gently change from light to shadow and it's a much better look.
As I stare at the knobs and pickups on the front of your first image, I can see a very definite shadow with defined edges -- which we don't want. This is because your light source appears to originate from a small area (basically a "point source"). There are many ways to diffuse light... shoot-through umbrellas, reflective umbrellas, soft-boxes, etc. will all cuase the light to appear to originate from a very broad source.
You also mentioned you are struggling with white balance and getting the colors to show accurately.
The easiest way to handle this (and nail it) is to use something called a "gray card". When you use a white balance setting on the camera, that's just a good "guess" at the right white balance setting. But when you use a gray card you can be sure you actually have the correct white balance... every time.
The "card" is just a surface that's painted gray. But not just any gray will work. This gray is formulated to be guaranteed to be "color neutral" and the camera and post processing software expect this. There are two ways to use it.
If you shoot JPEG images (I always only shoot RAW) then you place the gray card in the IDENTICAL lighting that you will use to photograph your subject. In the photo below, I'd put the gray card right in front of the guitar. Center the card in the camera's viewfinder and get in close (it doesn't need to fill the whole camera frame, but it should cover most of the middle of the frame.). The camera doesn't even need to be focused (its almost better if it's not focused). Take a photo of the card.
If you shoot RAW, you just need one photo that has the gray card in it -- anywhere. It just needs to be in the identical light conditions as your product. Remove the gray card after you take this shot and then shoot the rest of your images as you normally would. This "gray card" image will serve as a reference image and will be used later.
Since the room lights are not technical a neutral "white" color (the light has a colored tint to it) it will alter the color of the gray on the card. This is what we want because know we have an object for which the camera actually KNOWS the true "color" and yet it can see the "apparent" color (caused by the tint of the light) and this lets the camera (or computer software) make the color correction to get the colors back to true color.
If you shoot JPEG you can use something called "custom white balance" (CWB). You'll go into the camera's white balance menu, pick the "custom white balance" (CWB) option. It will prompt you to select the image on your memory card which contains the gray card shot. Find and select that image. The camera will then analyze the apparent color of the card (compared to what it knows is the true color of the card) and will adjust the colors by subtracing the color tint from the image. Now... EVERY shot you take with that particular CWB setting will have the identical color correction applied. Just note that if you change your lights, move your product to a different spot, etc. then you have to shoot a new gray-card image and re-select it as the new CWB reference image.
If you shoot RAW (my preferred method) the camera doesn't do anything as you shoot... just make sure you captured one image with the gray card and then shoot the rest of your shots without the card.
When you unload the images into your computer software, you'll find the image with the gray card and you'll use your "white balance" tool (Adobe Lightroom is recommended if you shoot RAW -- there are others.) The tool will usually have an eye-dropper icon. Pick the icon and it'll prompt you to go pick a pixel from your image. Go pick a pixel on that gray-card you have in the photo. The software will apply white balance correction based on the gray card and that will fix that one image to have accurate white balance. Having done this, you can now "sync" that white balance correction to every single shot you took in your photo shoot (provided they were shot in the identical lighting). You've now applied white balance correction to the entire shoot.
I should warn you that the colors on your computer monitor are probably not accurate unless you own a color calibration tool and have calibrated the monitor. I use a Colormunki Photo (by X-Rite). The Datacolor Spyder is also popular. It has software that changes the color of your display to various calibration colors so the tool can determine how accurately your monitor displays color and it then creates a "profile" for your monitor so that the colors on your screen are true to real-life colors (otherwise when you think you have the color correct on YOUR screen, it may look wrong on someone OTHER screen.)
There is a little more to it... but that gets color pretty close. It turns out your camera may have various levels of sensitive to saturations of reds, greens, and blues that vary. So X-Rite makes a device called the "Color Checker". It has a card with colored squares on it -- you photograph the card, white balance it, and then pull up the image in their software and they can detect that even though the white balance is correct, certain color saturations may still need some tweaking -- and the software applies these adjustments for you. In the end you can be confident that the colors are bang-on accurate. If anyone else thinks the colors are wrong... it's their montior which is out of whack... not yours.
5D III, 5D IV, 60Da
- Mark as New
- Bookmark
- Subscribe
- Mute
- Subscribe to RSS Feed
- Permalink
- Report Inappropriate Content
05-04-2015 03:26 PM - edited 05-04-2015 03:30 PM
Wow, Tim. I really REALLY appreciate the time you took to gave to that response. When I say "diffuser gel", its not what you typically see as a colored gel. It looks more like a dryer sheet but it is heat rated fabric that is designed to diffuse the light. May still be what you're talking about but just wanted to clarify.
I guess its true, you don't know what you don't know! Some awesome tips here. I'll pass this on to my associates.
Thanks Again!
Jamie
- Mark as New
- Bookmark
- Subscribe
- Mute
- Subscribe to RSS Feed
- Permalink
- Report Inappropriate Content
05-05-2015 10:14 AM
"Do we need more light?"
In a word, yes. You need fill light. The disappearing edges are caused by shadows. Fill light will get rid of them.
Light placement is the main most important thing. The difference between music instruments and cameras is, one records sound and the other records light.
If you have any fairly decent post editor, you should be able to correct any color mismatch with out issue. One tip I might give you, don't make is more than it is. Lots of folks make photography harder than it has to be.
EOS 1D, EOS 1D MK IIn, EOS 1D MK III, EOS 1Ds MK III, EOS 1D MK IV and EOS 1DX and many lenses.
12/18/2024: New firmware updates are available.
EOS C300 Mark III - Version 1..0.9.1
EOS C500 Mark II - Version 1.1.3.1
12/13/2024: EOS Webcam Utility Pro V2.3b is now available to support Windows on ARM PC users.
12/05/2024: New firmware updates are available.
EOS R5 Mark II - Version 1.0.2
11/14/2024: Windows V 2.3a installer for EOS Webcam Utility Pro is available for download
11/12/2024: EOS Webcam Utility Pro - Version 2.3 is available
09/26/2024: New firmware updates are available.
EOS R6 Mark II - Version 1.5.0
08/09/2024: Firmware update available for RC-IP1000 - Version 1.1.1
08/08/2024: Firmware update available for MS-500 - Version 2.0.0
- EOS Rebel XS lens recommendations for sports photography in EF & RF Lenses
- Camera Upgrade suggestions in EOS DSLR & Mirrorless Cameras
- Firmware 1.0.1 Brand New R5 Mark II Freezing/Error 70 in EOS DSLR & Mirrorless Cameras
- Canon Rebel T7 - Screen stuck intermittently -doesn't allow me to change any setting in EOS DSLR & Mirrorless Cameras
- EOS 70D How to keep LCD screen on while taking pictures in EOS DSLR & Mirrorless Cameras
Canon U.S.A Inc. All Rights Reserved. Reproduction in whole or part without permission is prohibited.


