- Canon Community
- Discussions & Help
- Camera
- EOS DSLR & Mirrorless Cameras
- 6D MKII a disappointment???
- Subscribe to RSS Feed
- Mark Topic as New
- Mark Topic as Read
- Float this Topic for Current User
- Bookmark
- Subscribe
- Mute
- Printer Friendly Page
6D MKII a disappointment???
- Mark as New
- Bookmark
- Subscribe
- Mute
- Subscribe to RSS Feed
- Permalink
- Report Inappropriate Content
07-28-2017 11:33 AM
I did order the 6D MKII from B&H - arrives Monday. This is an upgrade from my 6D. I am a little concerned about the recent tests showing, at lower ISO's, poorer dynamic range. Apparently the 6D MKII showed very good dynamic range at higher ISO's. Apparently the 80D had better dynamic range at lower ISO"s then the 6D MKII. I'll know a lot better when I get the camera but is that is the truth its a little disappointing for what I'm paying for this camera.
Any comments??
James
- Mark as New
- Bookmark
- Subscribe
- Mute
- Subscribe to RSS Feed
- Permalink
- Report Inappropriate Content
07-28-2017 12:17 PM
@skyking wrote:I did order the 6D MKII from B&H - arrives Monday. This is an upgrade from my 6D. I am a little concerned about the recent tests showing, at lower ISO's, poorer dynamic range. Apparently the 6D MKII showed very good dynamic range at higher ISO's. Apparently the 80D had better dynamic range at lower ISO"s then the 6D MKII. I'll know a lot better when I get the camera but is that is the truth its a little disappointing for what I'm paying for this camera.
Any comments??
James
The 80D's RAW file was optimized to score well on the 'tests'. The 'tests' have never accurately reflected the true dynamic range of Canon cameras, because typically Canon has rawer, RAW files than other companies. Canon bakes less processing into their RAW files, and also uses a different black point method. *1
Worry if the camera does what you want and not how it scores on the 'tests'.
If you are interested I have some tips on how to optimize the dynamic range from your rawer Canon RAW files in Lightroom. Basically using Lightroom setting to duplicate what is baked into other companies RAW files.
*1 - 'Nikon currently clips the average read noise at zero, losing some data. Canon includes an offset, so processing by some raw converters can preserve the low end noise, which can be important for averaging multiple frames to detect very low intensity subjects (as in astrophotography).' - Roger Clark, PhD, NASA
- Mark as New
- Bookmark
- Subscribe
- Mute
- Subscribe to RSS Feed
- Permalink
- Report Inappropriate Content
07-28-2017 02:22 PM
Roger - Many thanks for your insight. I do agree that sometimes we get caught on what "testing" says and not reality. If you can I would love to get your tips on enhancing the RAW files in Lightroom. BTW, I use Lightroom and lately On1 Raw to process my raw images. Again, any tips you could provide would be greatly appreciated.
Again, your insight was very much appreciated.
James
- Mark as New
- Bookmark
- Subscribe
- Mute
- Subscribe to RSS Feed
- Permalink
- Report Inappropriate Content
07-29-2017 10:35 AM - edited 07-29-2017 10:35 AM
"Worry if the camera does what you want and not how it scores on the 'tests'."
Wow, you are learning! I am impressed but this certainly is the right way to 'test' a camera. Forget the reviews and so-called tests. How it works for you in the field is what is important. Unless you intend to photograph test charts, that is!
EOS 1DX and many lenses.
- Mark as New
- Bookmark
- Subscribe
- Mute
- Subscribe to RSS Feed
- Permalink
- Report Inappropriate Content
07-29-2017 03:23 PM
Thanks for your advice and you are 100% correct. I do think we get Carried away with what the "testing" says!!
Thanks again for some great advice!
James
- Mark as New
- Bookmark
- Subscribe
- Mute
- Subscribe to RSS Feed
- Permalink
- Report Inappropriate Content
07-29-2017 03:38 PM - edited 07-29-2017 06:31 PM
@skyking wrote:Roger - Many thanks for your insight. I do agree that sometimes we get caught on what "testing" says and not reality. If you can I would love to get your tips on enhancing the RAW files in Lightroom. BTW, I use Lightroom and lately On1 Raw to process my raw images. Again, any tips you could provide would be greatly appreciated.
Again, your insight was very much appreciated.
James
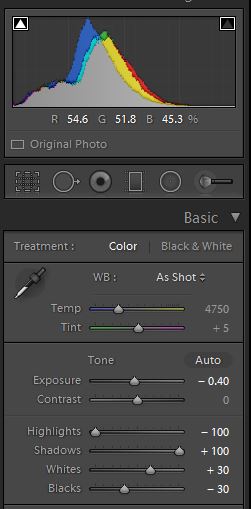
As mentioned above Canon and Nikon set the black point in their RAW files differently so the key to processing a Canon RAW file is to make sure you have a true black, The example below is how I typically process a file. Note the Black alert on the histogram is showing and the highlight alert is not.
All photos are different, but, this is typical processing.
First Highlights are set to -100, and Shadows are set to +100.
Next I get a rough estimate of what my Whites to Black number should be. I want them the same in the end, but, to get a rough estimate run whites up until they clip and blacks down till they clip add the two numbers together and divide by two. Then set White to + (plus) that number and blacks to - (minus) that number.
I then set the exposure so that whites are just shy of clipping on any channel and blacks are just black on all channels. I may have to fine tune the Blacks and Whites at this time.
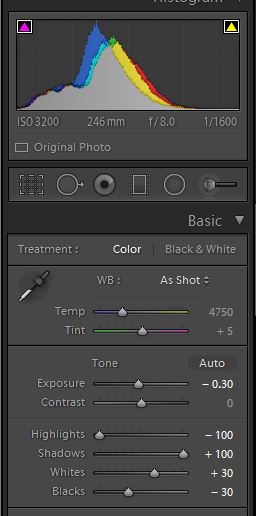
As you can see in the histogram below increasing the exposure from -.40 to -.30 would cause the whites to start to clip and the blacks start to not be fully black.
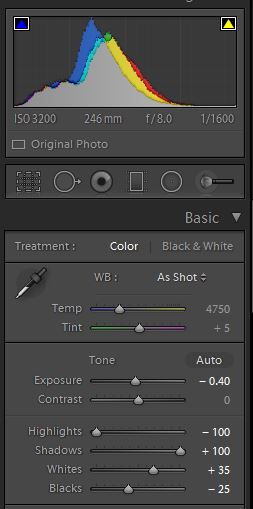
Same with the histogram below, with the exposure set back to -.40 if you increased Whites to +35 or Blacks to - 25, whites would clip and the blackest blacks would no longer be true black.
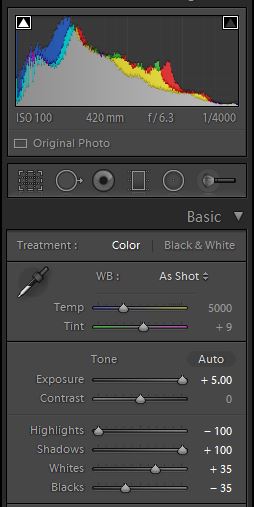
This technique works for properly exposed photos or ones that aren't like the photo below that was five (5) stops underexposed.
Again note Whites and Blacks are equally offset, but, now the exposure is +5.00. Yes, the photo required noise reduction and some has some 'brush' processing, however it was done completely in Lightroom and is overall usable for a photo from and APS-C 7D Mk II with it's poor dynamic range test scores.
edit: Note: this technique does not seem to work as well on cameras whose RAW files have already been optimized for testing like the 80D or 5D Mk IV.
- Mark as New
- Bookmark
- Subscribe
- Mute
- Subscribe to RSS Feed
- Permalink
- Report Inappropriate Content
07-29-2017 05:36 PM - edited 07-29-2017 05:39 PM
I think that I might be doing the same think as TTMartin, except maybe from a different direction, to set the widest dynamic range between whites and blacks without saturation.
After applying lens correction and some clarity during Import, the first thing I do is set the W to B dynamic range. Note the images of the triangles at the top corners of the histograms. The saturatio indicator on the left is for Blacks, and the one on right is for Whites.
The above image on the left shows both Blacks and Whites as being "under", and each can be boosted slightly. This means increasing the Whites level slider, and decreasing the Blacks level slider. More on making adjustments later. Notice how both indicators are not "lit". They are dark.
The image in the center shows both indicators are "over", and are fully lit to the point where they are white. To me, this indicates saturation of both the Whites and Blacks levels. Note the slider settings compared to the "under" image.
The image on the right shows the "ideal" setting. Note how the triangle has changed to a color. Still haven't bothered to figure out what the color means, but I think it is trying to tell me something about the color spectrum.
Making adjustments is pretty simple. Using a Windows PC, I hold down the "ALT" key, and adjust the Whites to the right. The image should go completely dark, and only light up the areas that are saturated as over exposed. You want to increase the level until just before things begin to light up.
If you begin the adjustment, and the screen is completely dark, you will see the saturation indicators will be dark. As you increase the level, the indicator will suddenly turn white. There is a sweet spot between fully off and fully on, where the triangle displays as a colored triangle. This is my goal.
I adjust the Blacks level in a the opposite fashion. If you hold down the "ALT" key as you adjust the slider, the image will turn pure white, and the saturation indicator will probably be fully off. As you decreaase the level, dark spots will appear and the saturation indicator will turn fully white. Back off decreasing the adjustment, and the indicator will change from white to a color. Again, this is the sweet spot that I strive to reach.
[EDIT] Sometimes I will get the outlier exposure, and cannot find a sweet spot. In these cases, I will adjust the Highlights slider to -50, and begin adjusting the Whites. Similarly, I may adjust the Shadows slider to +50, and begin adjusting the Blacks.
"Enjoying photography since 1972."
- Mark as New
- Bookmark
- Subscribe
- Mute
- Subscribe to RSS Feed
- Permalink
- Report Inappropriate Content
07-29-2017 05:49 PM
This is outstanding!!! I greatly appreciate you taking to time to help and ease my "fears" of purchasing this camera. This is also an education to say the least.
Again, Many, many thanks for taking the time to help me. I'm printing your info out for reference.
James
- Mark as New
- Bookmark
- Subscribe
- Mute
- Subscribe to RSS Feed
- Permalink
- Report Inappropriate Content
07-29-2017 06:30 PM
@Waddizzle wrote:I think that I might be doing the same think as TTMartin, except maybe from a different direction, to set the widest dynamic range between whites and blacks without saturation.
No, I do not believe we are doing the same thing.
And as I mention since Canon sets their black point differently, keeping the left black triangle 'clear', means you don't have a true black, and are maintaining 'noise' that other manufacturers bury below the black level. That is the reason those cameras score well on the 'tests'. After years of hearing how Canon sensors lacked dynamic range and were noisy, and learning what other manufacturers were baking into their RAW files, I developed my technique to duplicate that baked in processing. And one of the key things is to understand, with Canon RAW files you need to create a true black, black level.
The left image you have the Blacks set to a positive number I recommend, NEVER doing that.
Also, without bringing Shadows to +100 and Highlights to -100 you are not maximizing the dynamic range of the image or the camera.
- Mark as New
- Bookmark
- Subscribe
- Mute
- Subscribe to RSS Feed
- Permalink
- Report Inappropriate Content
07-29-2017 07:03 PM
So, if I "hear" you correct I never want to take the black point above "0" and can pull the black point to the negative and even "clip" the blacks. Am I correct??
James
01/20/2026: New firmware updates are available.
12/22/2025: New firmware update is available for EOS R6 Mark III- Version 1.0.2
11/20/2025: New firmware updates are available.
EOS R5 Mark II - Version 1.2.0
PowerShot G7 X Mark III - Version 1.4.0
PowerShot SX740 HS - Version 1.0.2
10/21/2025: Service Notice: To Users of the Compact Digital Camera PowerShot V1
10/15/2025: New firmware updates are available.
Speedlite EL-5 - Version 1.2.0
Speedlite EL-1 - Version 1.1.0
Speedlite Transmitter ST-E10 - Version 1.2.0
07/28/2025: Notice of Free Repair Service for the Mirrorless Camera EOS R50 (Black)
7/17/2025: New firmware updates are available.
05/21/2025: New firmware update available for EOS C500 Mark II - Version 1.1.5.1
02/20/2025: New firmware updates are available.
RF70-200mm F2.8 L IS USM Z - Version 1.0.6
RF24-105mm F2.8 L IS USM Z - Version 1.0.9
RF100-300mm F2.8 L IS USM - Version 1.0.8
- EOS R6 Mark II Questions about airplane mode in EOS DSLR & Mirrorless Cameras
- EOS Utility 3.0 How to zoom an image in Quick Preview in Camera Software
- R5 Mkii & R1 - Is there a programmable button to turn off auto focus/turn on manual focus in EOS DSLR & Mirrorless Cameras
- Canon R6 Mark II freezing with BUSY screen when in slower shutter speeds in EOS DSLR & Mirrorless Cameras
- 24-105mm L Image Stabilization Issue - Only Works on Live View in EF & RF Lenses
Canon U.S.A Inc. All Rights Reserved. Reproduction in whole or part without permission is prohibited.
