03-10-2017 09:37 AM
Hi. I hope I'm posting this at the right thread, else please advise if this isn't the right section for this.
I've recently received a 5DM3 as a graduation gift and got myself a 50mm lens to shoot along with. I didn't study or learn photography and most of what I know I learned it off the internet, so I'm still rather new to this.
I'm not sure whether my original settings were wrong or that my sensor isn't clean. The images I've shot looked decent in RAW, grain isn't that bad, however once I start tweaking with the settings in Camera Raw(photoshop), the grain becomes rather obvious and it gets worst even with slight brightness/colour changes with photoshop.
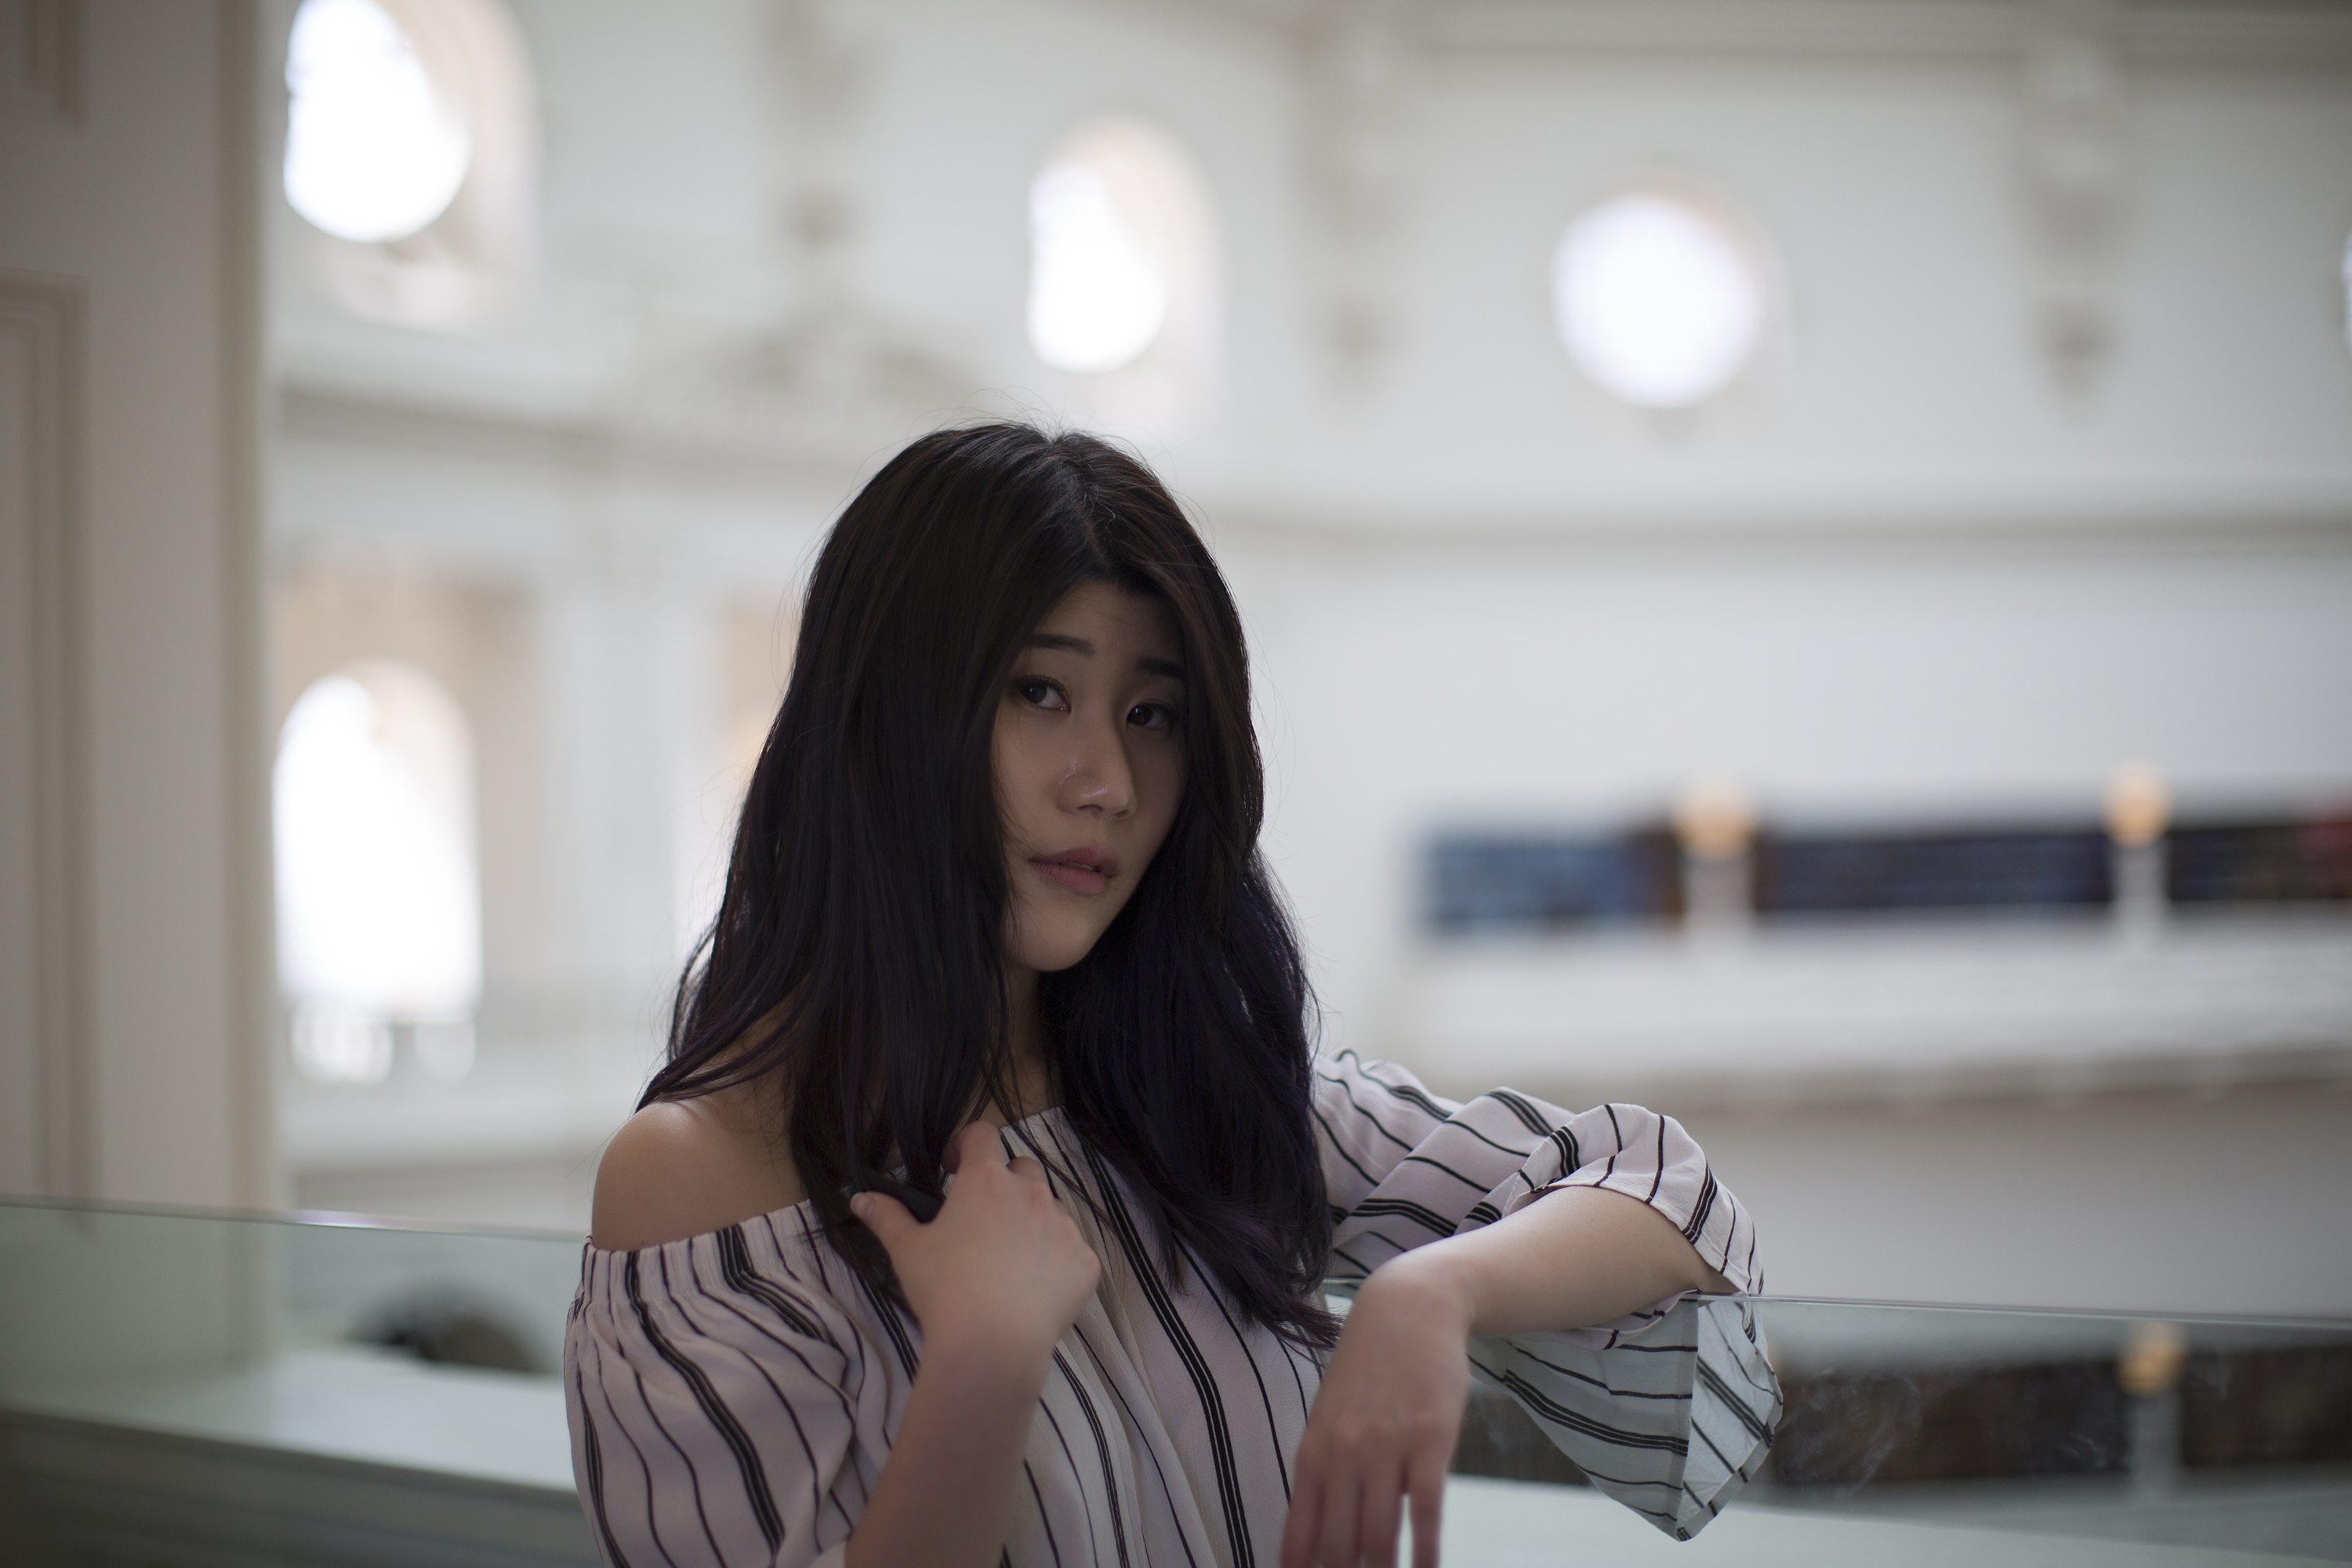
The below image was shot with the following settings: Manual, f1.4, 1/250s, ISO 200, 50mm.
JPEG output from RAW no changes
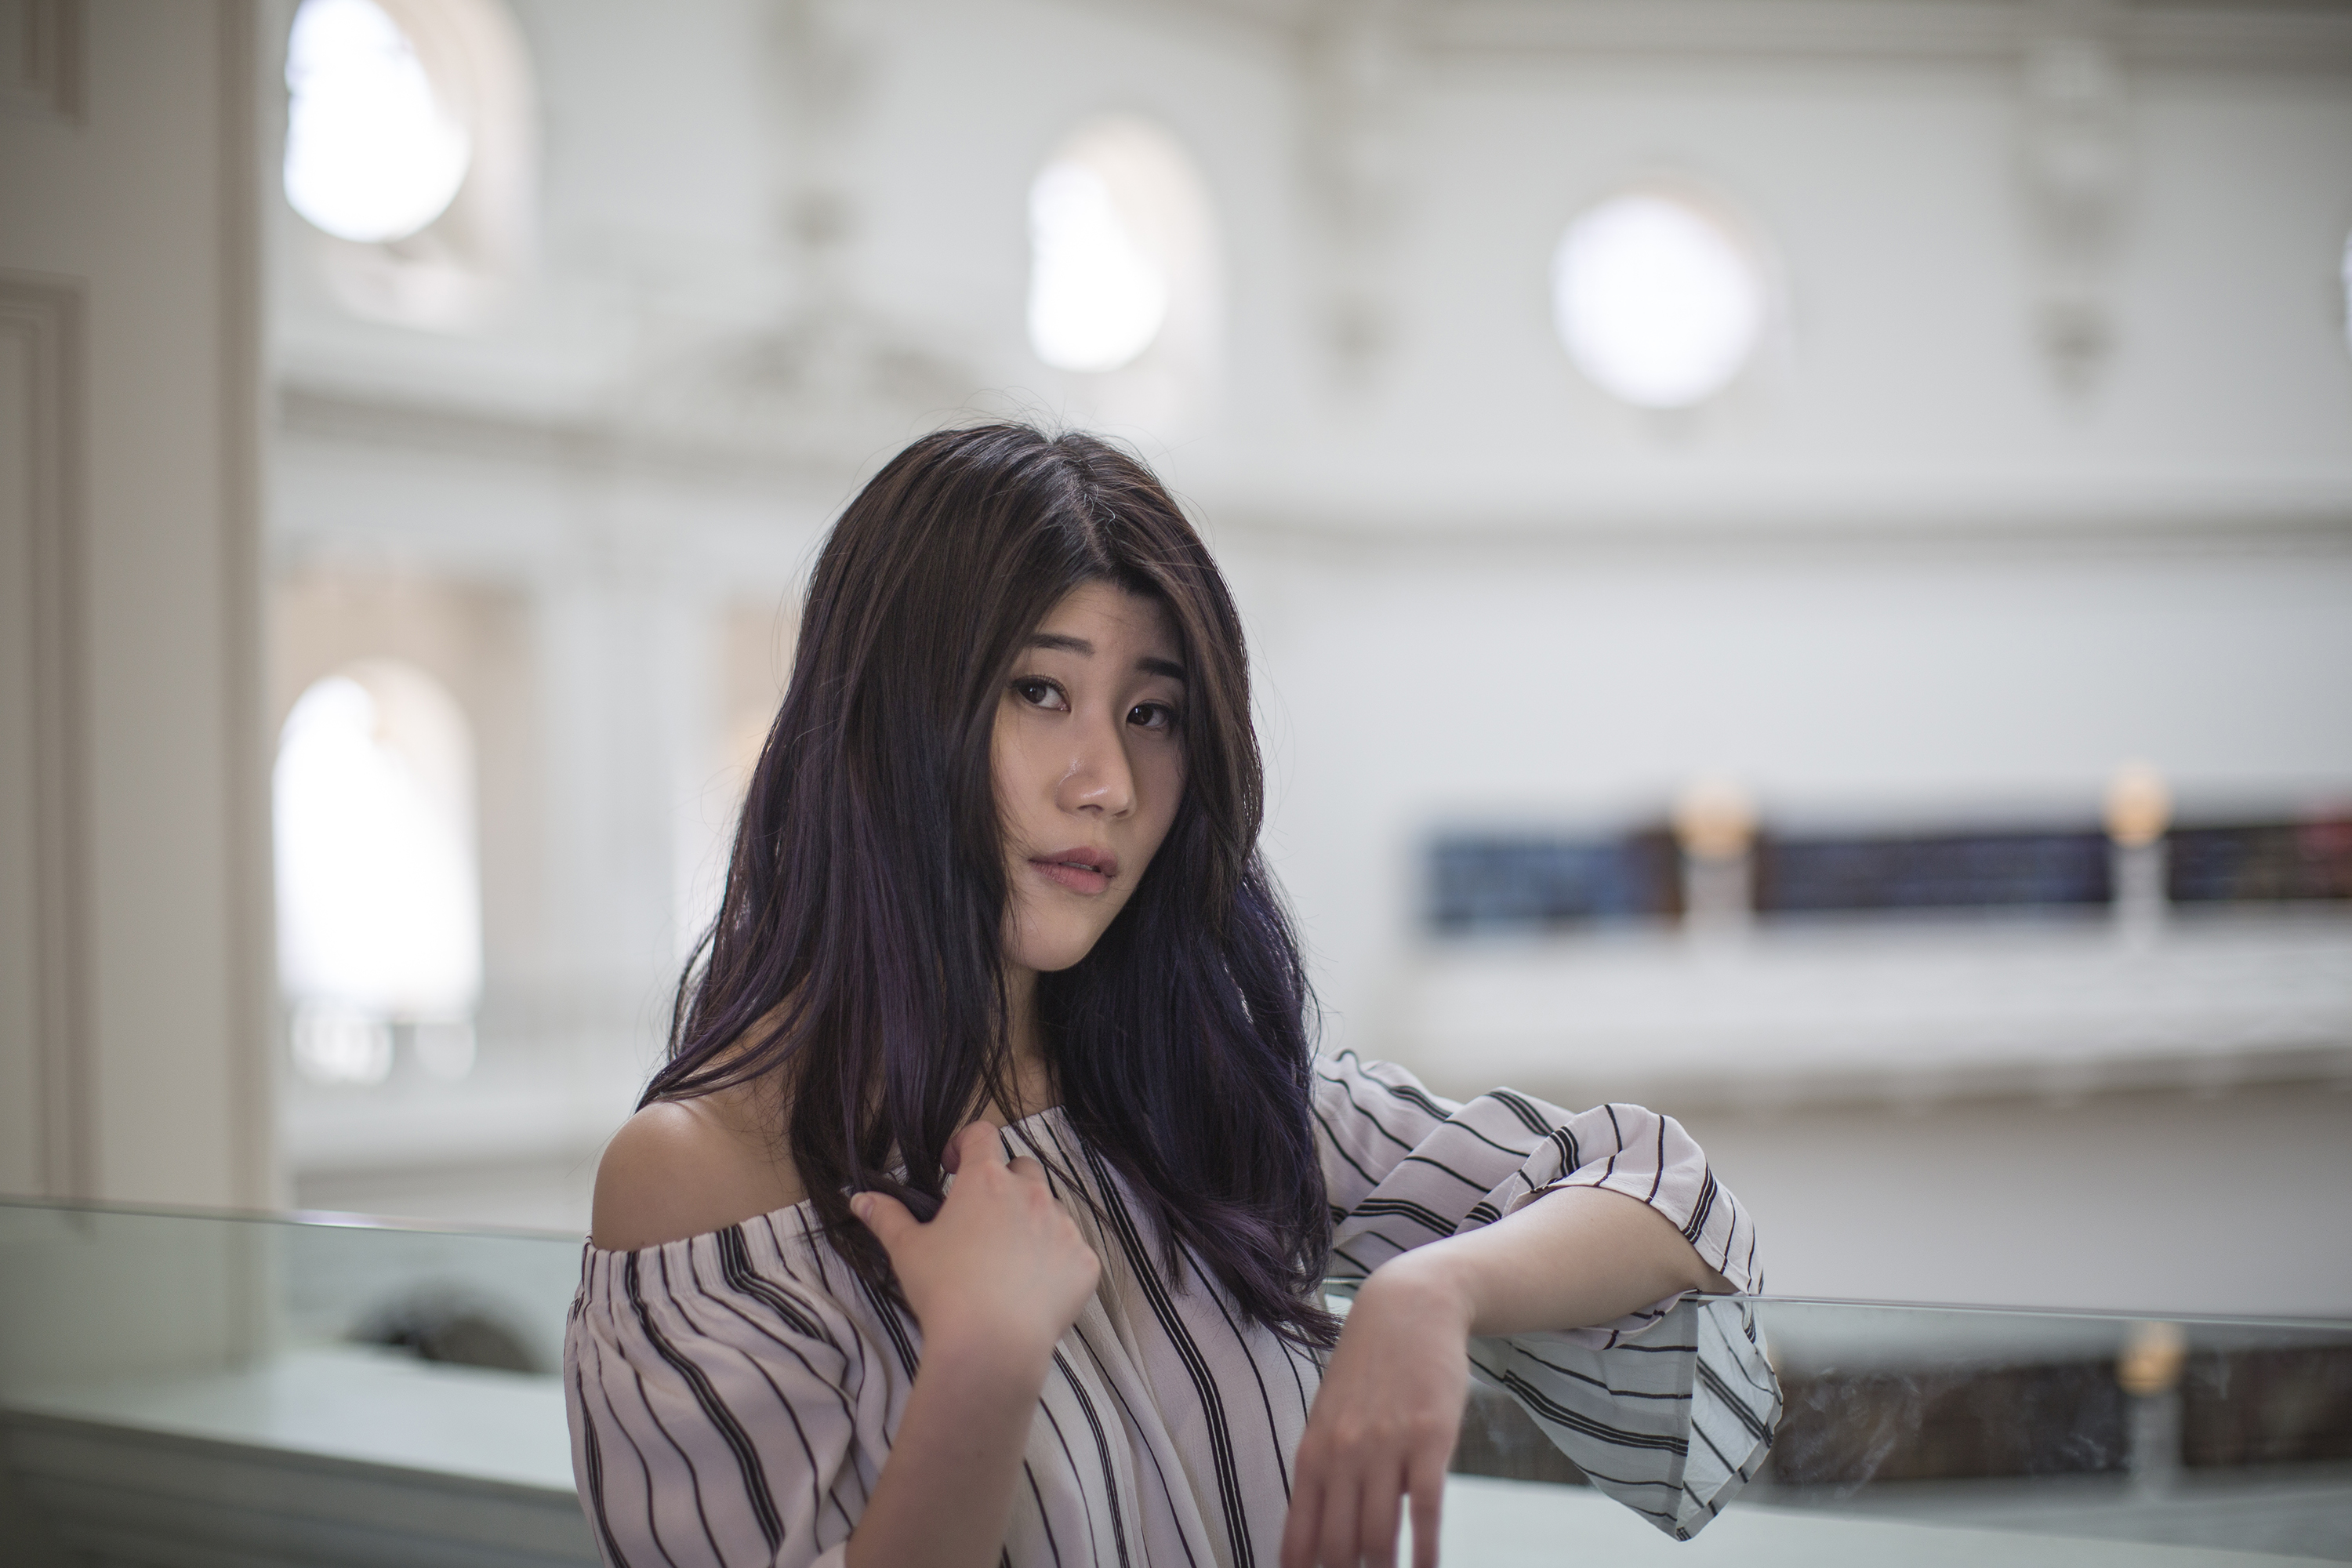
JPEG output from RAW with some setting adjustments (done in Camera RAW in photoshop)
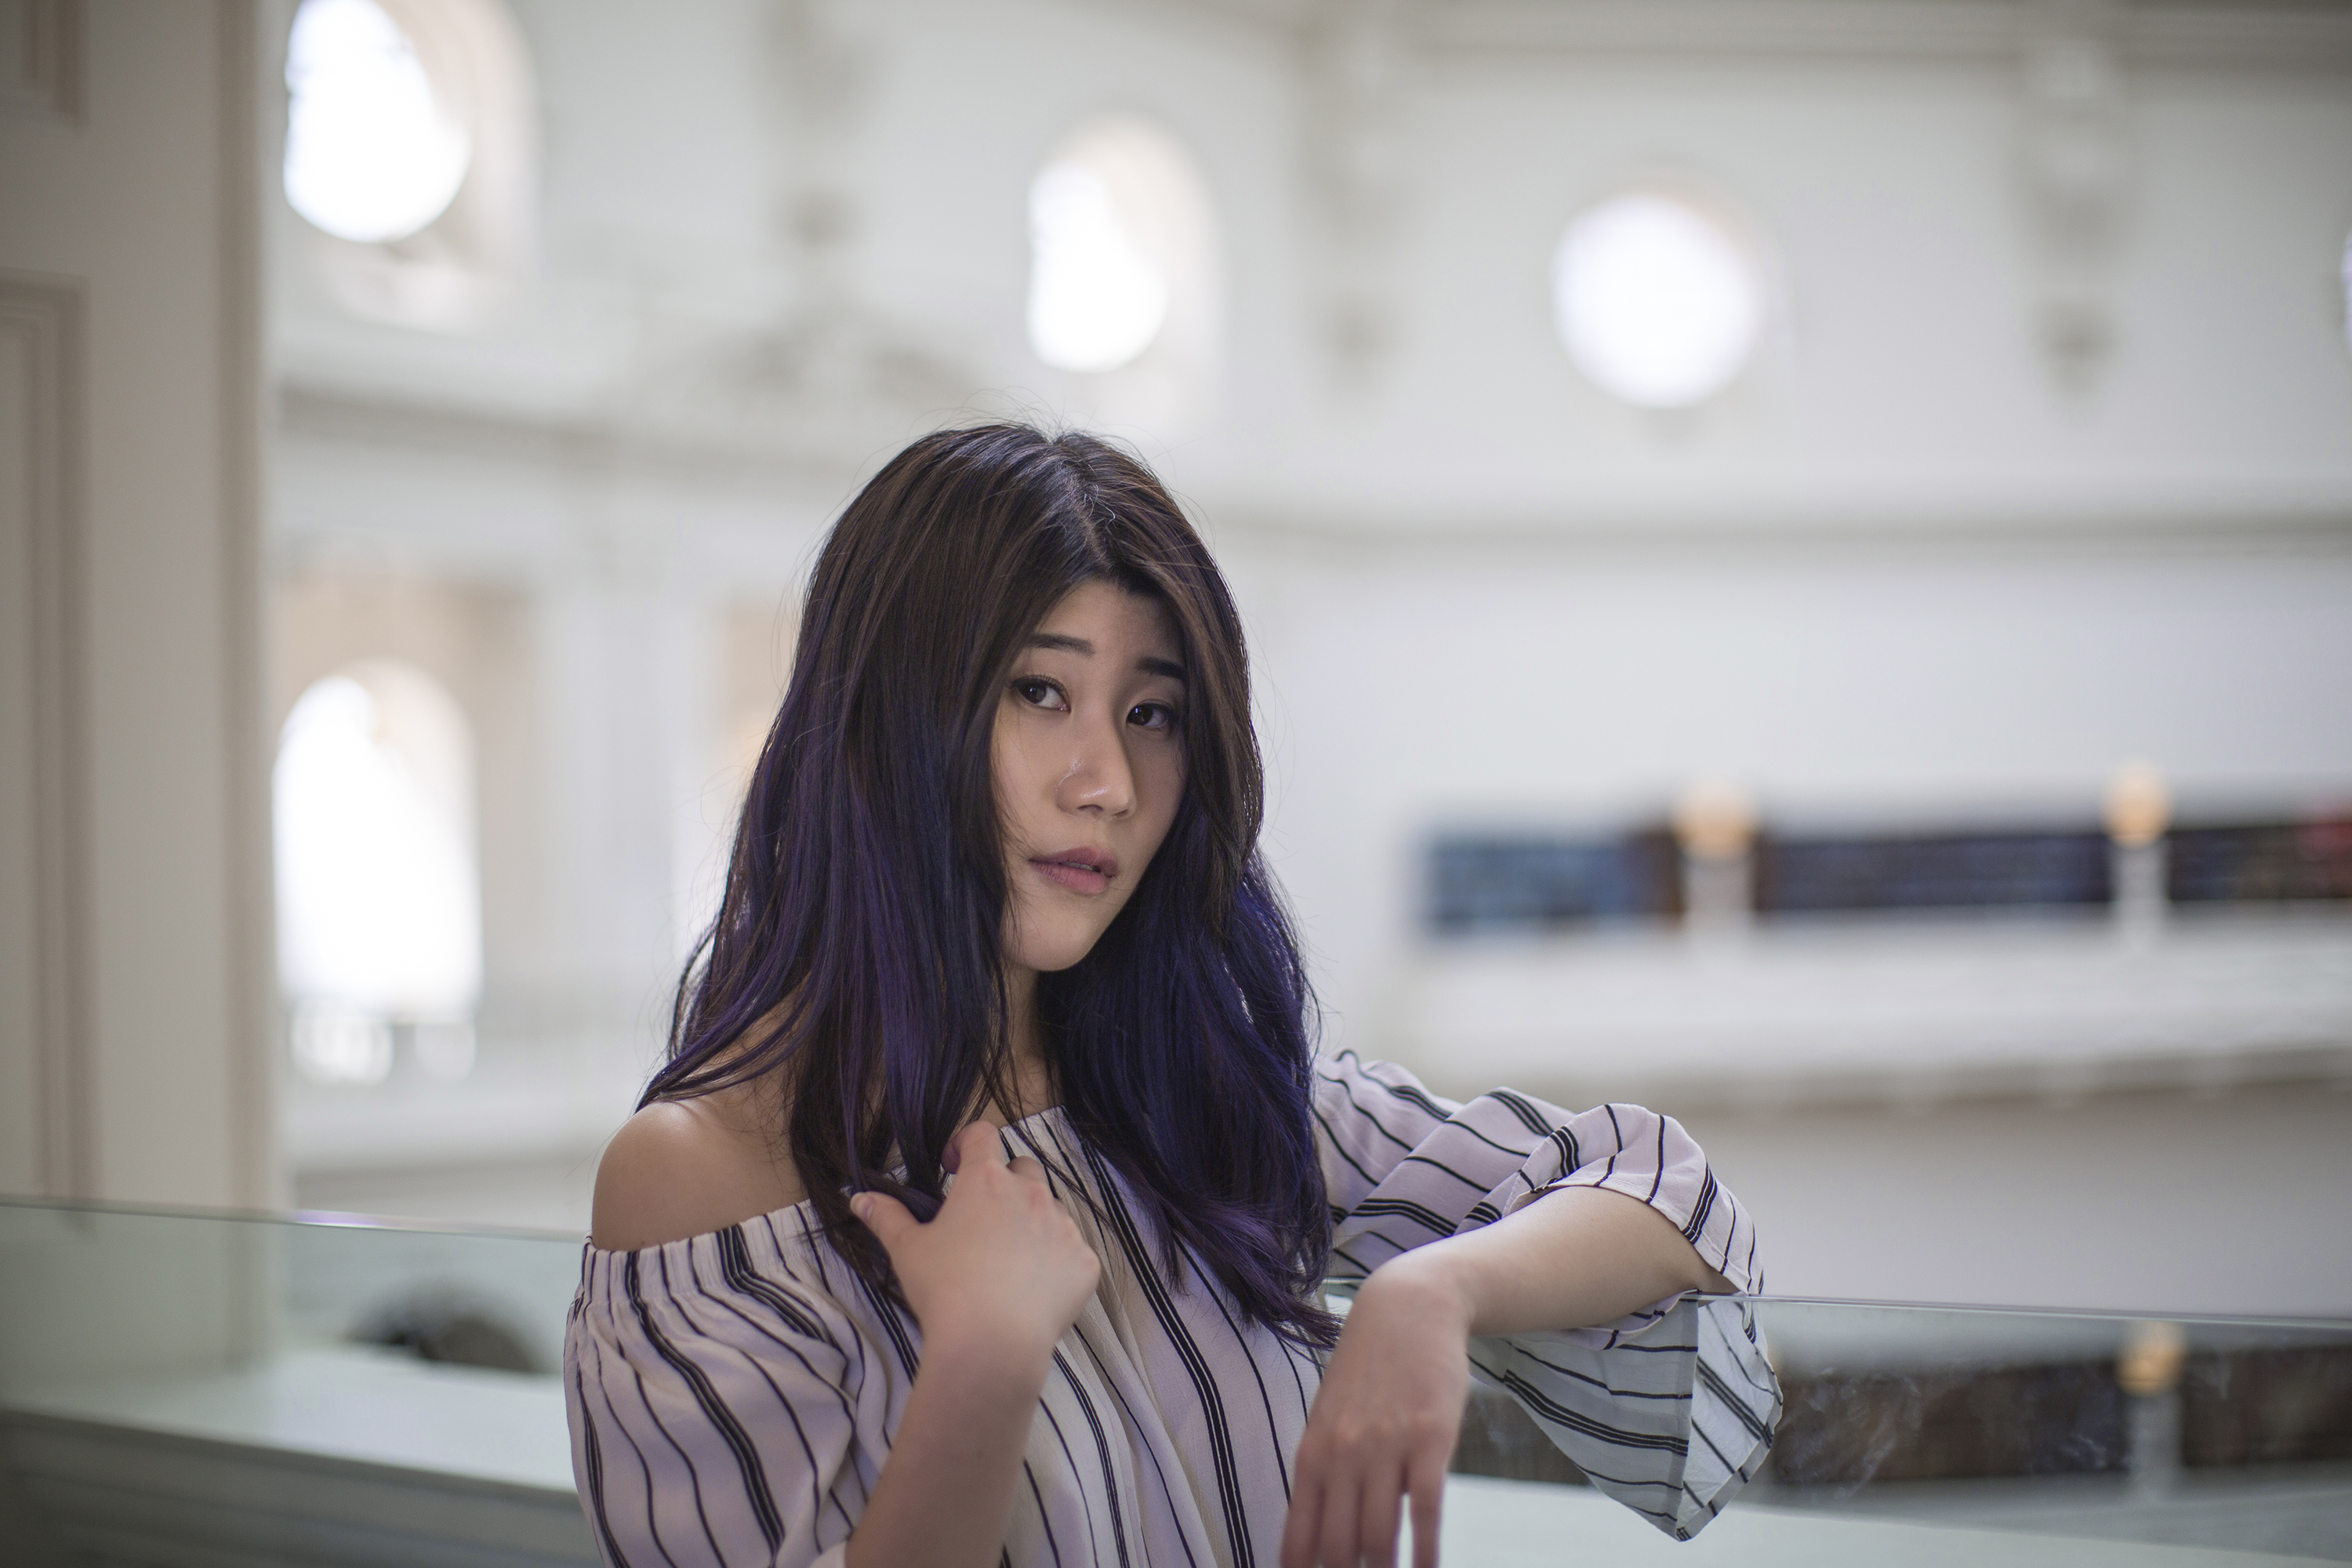
JPEG with slight colour adjustments and clearning on photoshop CC
When the image is zoomed in 100% (full image size at 5760x3840px), the grain is really bad, especially around the hair and face. You can already see it from the second image attached. I'm not very confident to send this image to my friend as the quality isn't as smooth and clean as I've seen from other people.
So what I'm trying to figure out now is this:
1. Was my camera settings wrong?
2. Was the ambient light at the location throwing off the exposure which resulted to the grain? (shot around 3pm in the afternoon, lots of back light in the background)
3. Did I overdo the image adjustments in Camera RAW and then further affected it in photoshop?
4. Is the format of the image wrong? Should this be exported as TIFF instead of JPEG?
5. Is the size wrong? Like should I reduce it to a smaller dimension? When this was reduced to 1500x1000px the grain wasn't so bad even with all the edits.
I hope you guys can help me out and advice where I've mucked up. This is doing my head in as I thought I had the settings and everything sorted during the shoot.
Also if this isn't the right thread please let me know! First time posting and all.
Solved! Go to Solution.
03-10-2017 10:38 AM
03-10-2017 10:37 AM
If the 'quality' of the availible light isn't there, you will notice more grain. That is porbably what you are seeing. Never work with jpg. Always work in RAW or tiff. jpg uses compresion which deletes data. jpg are for posting on the inner web or final file format for customers.
As to the sliders in ACR or PS, less is more. Some people like the comic book look, like one indivual on this forum but usually don't do it. It doesn't seem like you were excessive but keep it in mind.
Take your gear outside on a bright day and try normal settings using P mode. Check to see how they look. Pretty good I will guess and it means there is nothing wrong with your gear. Just the quality of the light was not there for you and the young lady.
You might want to check out Peter's post on noise. He explains it very well.
03-10-2017 10:38 AM
03-10-2017 10:49 AM
03-10-2017 12:29 PM
Your camera is working perfectly. Here's the deal...
The "grain" you refer to is called "noise" in digital photography. The sensor is trying to collect photos of light (signal) and in doing so, it will also accumlate "noise". The goal is typically to have a high "signal to noise" ratio (or SnR). Exactly why all digital sensors have noise is a long topic (and some of it has to do with quantum physics) so we'll avoid that and just cut to the answer.
When you shoot JPEG, the image you get out of the camera has been "processed". It's as-if the camera has a copy of photoshop in it and does some cleaning up of the image for you. When you take the shot, the image is read out from the sensor and, at that point, it would render exactly as the RAW (because it is a RAW even though you are shooting JPEG) but since you opted for JPEG, the camera gets to work applying adjustments... so it applies white balance, it may apply color profiles, it will apply some sharpening, and based on the ISO setting of the camera, the camera anticipates a certain about of noise and so it will also apply some de-noising.
What you get as a result, is a relatively clean looking image. But it's been processed to clean it up (in the camera).
When you shoot RAW, none of this happens. The camera reads out the image from the sensor and saves it to a file. It doesn't even de-mosaic the image into true "pixels" (that's up to computer software to deal with it). That means the image has had any corrections or adjustments of any kind... no sharpening, no white balance, no color profile, no de-noising, etc. etc.
That image will show all it's flaws.
This sounds like a good argument to shoot JPEG all the time... but that would be a mistake.
It turns the weakness with JPEG is that the format was designed for "final output" and it also tries to reduce file size by compressing the data. So JPEG will take two adjacent pixels that are so nearly identical that your human eye cannot detect a difference... and it will "normalize" the data by just making them identical pixels. This helps make the image comrpess to a smaller file size. The *problem* happens when you try to adjust that image later.
Suppose you shot an image of a wedding dress and just imagine it's a "white" dress with "white" lace patterns. But also imagine that the exposure is very high (high key) while not technically blown out. The "lace" patterns may be so bright that they are difficult to detect with your eye -- but they are technically there. A "JPEG" storage algorithm will normalize the pixels that it assumes your eyes cannot detect and it'll just store identical "white" pixels.
You, being the photographer, realize it's just a bit over-exposed and you want to adjust the exposure down slightly to reclaim some of that detail. But since the JPEG algorithm "normalized" the pixels, the subtle difference are now gone. The dress lost it's texture and it's just a flat blotch of white area.
In RAW, those extremely subtle differences still actually exist (even if your eyes don't see it) so that when you do start to adjust the image, you can see it reclaiming the detail (as long as it wasn't blown out or "clipped").
This makes RAW much more useful for images that you plan to adjust. But they don't start out looking as good.
Remember there is nothing the camera applied when it converted the RAW sensor data into a JPEG that you can't apply on the computer.
Most RAW processing software (e.g. Adobe Lightroom for example) will use a camera "profile". The "profile" is basically a set of adjustments that should be applied based on camera performance. So it knows it should touch up the color, sharpening, de-noising, etc. by some subtle amounts and it does so as soon as the images are imported. But these adjustments are applied without destroying the original data (so if you don't like what the profile did, you can reverse it). This means importing RAW is just as easy as importing JPEG and the RAW's are auto-adjusted. But ultimately you have more control over the RAW.
So what can you do about the noise?
Lightroom has pretty good de-noising adjustments builtin (better than Photoshop). But in Photoshop I use a plug-in called "Noiseware Pro" by ImageNomic. The plug-in allows you to do a smarter de-noising process because noise usually shows up more in darker/shadow regions, but not as visible in highlights/bright regions. So I can adjust the software based on tonal range where it's a bit more agressive in the darks and less agressive in the lights. The reason that's nice is because de-noising also tends to soften the overall look (because it's averaging pixels to reduce noise). It helps to be able to apply de-noising only where it's needed and avoid applying it globally across the image. You can also create a mask in photoshop to detect edges so that you avoid de-noising near edges where you want the image to remain sharp, but apply more aggressively in flat (non-detail / non-contrasty) regions.
07-26-2019 01:13 AM
Thanks, this was very helpful. 🙂
03-10-2017 05:50 PM
03-12-2017 08:55 AM
First of all, the grain (noise) in your picture is not really an issue. A little bit noise reduction and stop watching at 100% will help.
Read below if you want to have a more geeky explanation:
1. Sensors from Canon and for example Nikon can´t gather all the incoming light when you use a wide aperture, wider than f/2,8-f/4. At f/1,2 it may be an issue, at f/1,4 you can notice it. Between f/2,8-f4 you will need to measure it 😉 . Canon 1Ds III will have a light loss of 0,33 Ev and 450D will have a light loss of 0,7 Ev at f/1,4. Canon 1ds III will have a light loss of 0,54 Ev and a 450D will have a light loss of 1,1 Ev at f/1,2. Because of the light loss Canon raises the ISO instead and you can´t do anything about it more than to unmount the lens a little bit so that your camera can´t read the f-stop of the lens (and you will not be able to use AF either). Is this a problem? Yes and no. If you want to use the whole dynamic range of the sensor by using exposure to the right, you may blow the highlights when Canon brights the picture. This affects the raw file. If you own a 450D and a lens with f/1,2 and shooting at high ISO, Canon will brighten the raw file 0,5 Ev. If you use a 5D III and a 50/1,4 you will only get a lesser light loss like the one from 1Ds III. It is possible to try it out yourself to take a picture at f/1,4 with manual settings. Put the camera on a tripod, take a picture, unmount the lens a little bit and take a new picture. Compare the two pictures and the first one should be a little bit brighter with a little bit more noise. If you exposure to the right, you may also clip the highlights.
2. Temperature of the sensor. Warmer will increase noise. Shouldn´t be visible with the settings in your picture.
3. The important part-----> I checked the histogram of your picture. The brightest part of the wall has a value of 221. The windows have a value of 255 and the highlights are already blown out. That means you could have ignored the blown highlights in the windows and moved the histogram to the right a little bit further to lift the shadows from the woman´s face. I think a shutter speed of 1/200 second or 1/160 second would be enough to move the histogram enough to the right to maximum the collection of photons without clipping the highlights of the wall in the background. At 1/200 second or 1/160 second you shoulnd´t get any blur due to camera shake or motion blur with a standing model in front of you. Bring those shadows out of the noise and then as an added benefit, reduce the entire exposure (and the noise ) in post if you need to.
03-12-2017 10:03 AM
Sweet! I love the geeky explanation. Thanks Peter, helps a lot for me to understand the technical side of things. I'm still learning more about using the histogram to understand what's being blown out.
1. This is something entirely new to me! I've always been under the impression that because the apeture is wide, essentially the camera will capture more light. Though this is the first time I'm reading that incoming light isn't all that easy to be gathered entirely by a lens that's wider than f2.8-4. Does the light loss only apply in a large venue? Or it happens the same in a smaller area even with light coming in from a side window? Cause the place the image was shot at, was the upper floor of a library and the light was strong and nicely diffused, but like @ebiggs1 mentioned, I may not have caught the right amount of available light. Which also got me to think that I did not consider the light that gets bounced back onto the model. (mistakes to learn from)
2. How so? I've always thought that if the light/tone was more blue, it creates more noise. How does warmer tones in the sensor make it noisy? (though if this is a question I should google, I'm more than happy to but would like to hear your explanation )
3. Won't dropping the shutter to 1/200 or 1/150 brighten the entire shot and increase the exposure? Or the idea is that with enough light picked up, it would reduce the noise? Sorry if I'm reading this wrong, just want to double check and clarify incase I'm not understanding this right 🙂
03-12-2017 11:57 AM
@debsiew wrote:Sweet! I love the geeky explanation. Thanks Peter, helps a lot for me to understand the technical side of things. I'm still learning more about using the histogram to understand what's being blown out.
@1. This is something entirely new to me! I've always been under the impression that because the apeture is wide, essentially the camera will capture more light. Though this is the first time I'm reading that incoming light isn't all that easy to be gathered entirely by a lens that's wider than f2.8-4. Does the light loss only apply in a large venue? Or it happens the same in a smaller area even with light coming in from a side window? Cause the place the image was shot at, was the upper floor of a library and the light was strong and nicely diffused, but like @ebiggs1 mentioned, I may not have caught the right amount of available light. Which also got me to think that I did not consider the light that gets bounced back onto the model. (mistakes to learn from)
2. How so? I've always thought that if the light/tone was more blue, it creates more noise. How does warmer tones in the sensor make it noisy? (though if this is a question I should google, I'm more than happy to but would like to hear your explanation )
3. Won't dropping the shutter to 1/200 or 1/150 brighten the entire shot and increase the exposure? Or the idea is that with enough light picked up, it would reduce the noise? Sorry if I'm reading this wrong, just want to double check and clarify incase I'm not understanding this right 🙂
1. It has to do with sensor design. Back-illuminated sensors don´t have the same issue. You can read more about it if you search F-stop blues dxo. It is good to know about, but the real thing is number 3 below.
2. I didn´t mean colour temperature but how warm your sensor is at the moment.
3. It will increase the whole exposure and that is what you want to drag the noise out from the shadows. After that in your raw converter you can darken the uncliped highlights if you think it is to bright.
About histogram. The camera manufactors use the histogram from the jpg and not the raw file. Only third party software Magic Lantern has raw histogram in camera.
Some raw converters like RawTherapee has a raw histogram and it is possible to compare the raw histogram and the jpg histogram. It is also possible to use Rawdigger, but it costs money. My favorite software Darktable doesn´t have raw histogram but raw sensor clipping.
First picture a raw histogram from the display from my 6D. It shows 5% blown highlight in blue channel, 9% blown highlight in green channel and less than 1% blown highlight in red channel.
Next picture shows the raw histogram in RawTherpee.
Last picture shows Darktable and raw sensor clipping. In my opinion I should have taken a picture that only clipped perhaps 0,2% or 0,5% of the highlights. No one would have noticed those 0,5% and I would have gained less noise in the shadows. And as I wrote, this is geeky talk.
12/18/2024: New firmware updates are available.
EOS C300 Mark III - Version 1..0.9.1
EOS C500 Mark II - Version 1.1.3.1
12/05/2024: New firmware updates are available.
EOS R5 Mark II - Version 1.0.2
09/26/2024: New firmware updates are available.
EOS R6 Mark II - Version 1.5.0
Canon U.S.A Inc. All Rights Reserved. Reproduction in whole or part without permission is prohibited.