Hello All, Good day May I know weather I can use this Sigma lens in my Canon 90d DSLR camera. Sigma lens is “Sigma 18-50mm f/2.8 DC DN Contemporary Lens”. Thank you in Advance.
Hola buen dia.... tengo una maquina Virtual con Win 11 ARM, pero ningunb controlador de Canon me permite instalar las impresoras. nececito ayuda porfavor
I need assistance on how to revert my EVF back to a normal view. I was shooting a birthday party in low light with an external speed flash attached. One minute I can see through the view finder clearly the next something happened. How do I change thi...
I have reinstalled the cannon app, unplugging the printer and plugging it back in. I don’t know what else to do. The printer won’t communicate with my phone.
Over the weekend I took the opportunity to work with a model friend, Emma. I've been fortunate to have worked with her many times over the last 10 years so shoots are always relaxed and invariably we create results we are both pleased with.Camera set...
I am having an issue with the scanner on the Canon TR8500 Series printer. It is connected to a Windows 11 desktop computer. I will go through the initial issue and then the steps I did which got to what I think is the underlying issue.The scanner wil...
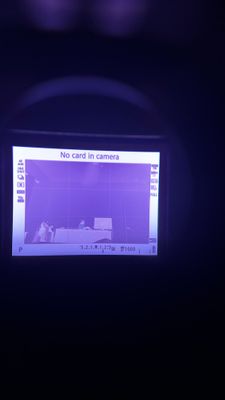
Well, my M50 seemed to have given up. My shutter is closed, even when the camera is powered off. When I switch it on, the screen and viewfinder don’t turn on, and there’s a faint pulsing sound like the motor is trying to activate the shutter.I’m tryi...
I switched from a Nikon DSLR to the Canon R7. I recently went to an airshow and I was trying to take pictures of all the airplanes the show. For some reason when I was trying to track an aircraft everytime it seemed to get close to the camera it woul...
We are currently running into an issue in our office with our printer/scanner. When ever someone tries to scan to email it gets caught on sending and resending, but after a few minutes of it saying sending/resending the scan job is canceled and put i...
ImageCLASS Mf733Cdw puts black marks near right side (portrait) at regular spacing. The marks are short faint black lines, about 1/2 inch in length, spaced at regular intervals of about 2.125 inches. There are two columns of marks (portrait perspec...
I have a 580ex ii flash. Sometimes the hss option vanishes from the menu and I can't figure out what I'm missing.How can I consistently access the hss option?When I press the hss button only the 2nd curtain sync appears.#580exii
Hello Members ,I am new to the group, can anyone suggest to me the best Canon camera compatibility /body with Tamron sp 150-600 mm f/5-6.3 di vc usd g2 . Mostly for wildlife photography. Many thanks.
My Canon Selphy CP720's Ink Cartridge has been stuck, I can't pry it out. It happened when I put a new Ink cartridge but it still said no ink but when I wanted to take it out, its stuck and I need some help
I am a weekend photographer shooting mainly holiday pictures whether it is landscape, portrait and animal. I am using a 5D Mark 3 with a number of EF lenses such as EF 24-105 F4L, and 70-200 F4L. Now i am retired and thinking of selling the 5D and ...