Turn on suggestions
Auto-suggest helps you quickly narrow down your search results by suggesting possible matches as you type.
- Canon Community
- Discussions & Help
- Printer
- Desktop Inkjet Printers
- PIXMA MG5720 Blurry print
Options
- Subscribe to RSS Feed
- Mark Topic as New
- Mark Topic as Read
- Float this Topic for Current User
- Bookmark
- Subscribe
- Mute
- Printer Friendly Page
Options
- Mark as New
- Bookmark
- Subscribe
- Mute
- Subscribe to RSS Feed
- Permalink
- Report Inappropriate Content
01-16-2021 08:08 PM
Hi, I recently changed the ink and now the black prints blurry or like double vision. I've cleaned the print head and ran a deep clean but still having the same problem. Can anyone shed some light on the solution? And where is the endcoder strip?
Solved! Go to Solution.
1 ACCEPTED SOLUTION
Options
- Mark as New
- Bookmark
- Subscribe
- Mute
- Subscribe to RSS Feed
- Permalink
- Report Inappropriate Content
01-16-2021 08:22 PM
Here are instructions on cleaning the encoder (timing) strip:
Description
Cleaning the encoder (timing) strip - MG5700 Series / MG6800 Series / MG7720
Solution
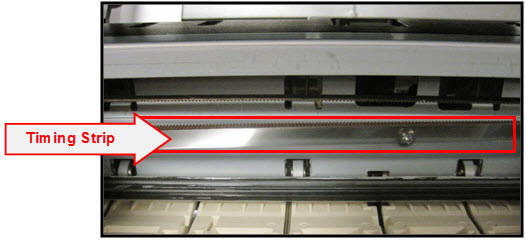
Click here to view an enlarged view of the timing strip.
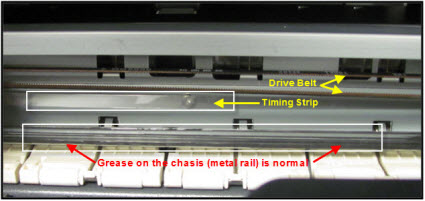
The timing strip is a clear, plastic strip approximately 1/4 inch in height positioned horizontally across the center of the unit, just in front of the carriage drive belt. The timing strip contains many thin black vertical lines that help determine the carriage position during operation.
During certain uncommon tasks such as the removal of a paper jam, it is possible to inadvertently touch a lubricated area on the printer's chassis causing a small amount of grease to be deposited onto the timing strip.
Grease on the timing strip may result in poor print quality including; mis-aligned or distorted characters, vertical lines or, in some cases, an inoperable error condition (such as 5100) or knocking / grinding noise.
In most cases, it is easy to remove the grease from the timing strip using common household items. If you wish, you may follow the steps below to remove the grease from the timing strip.
Items needed:
-Clean, unused cotton swab
-Small amount of Isopropyl Alcohol or window cleaner
-Flashlight or other light source
- Holding sides of the paper output tray, gently open it.
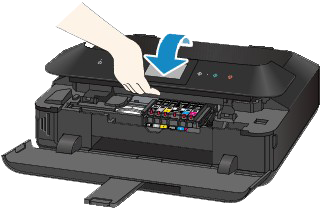
- Power on the printer then lift up and open the operation panel until it stops.
The Print Head Holder (carriage) will move to ink changing (center) position.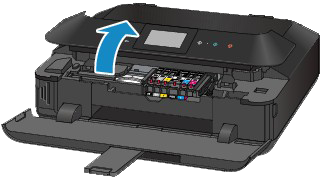
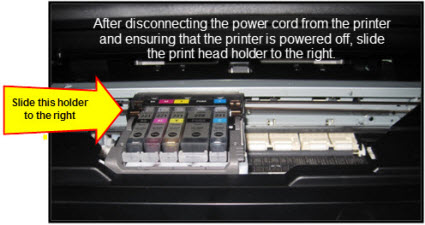
- With the operation panel open, unplug the power cord from the wall outlet or power strip. Be sure the printer's power LED is no longer illuminated.
This will allow you to easily slide the carriage left to right. Note:
Note:- When you move the print head holder, hold the top of the print head holder and slide it slowly to the right edge or the left edge.

- When you move the print head holder, hold the top of the print head holder and slide it slowly to the right edge or the left edge.
- Gently slide the carriage to the right side.
| Carriage is centered |
| Carriage is to the right |
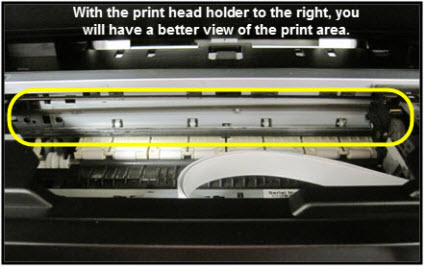
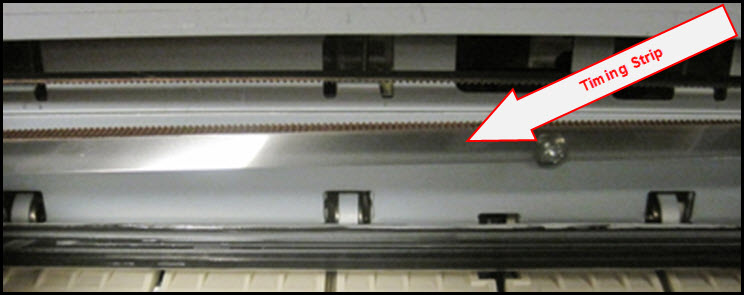
- Using a flashlight, carefully inspect the timing strip for grease that may have attached to the timing strip. It is helpful to view the timing strip from several angles as even a small amount of grease can impact print quality. Note: The timing strip is a clear strip located in front of the carriage drive belt.
- Moisten the cotton swab with Isopropyl alcohol and carefully remove the grease from the timing strip. To prevent further spreading of grease, be careful not to touch the chassis or other areas inside the unit which may contain grease from the factory. Note: If Isopropyl Alcohol is not available, you may use window cleaner solution.
 Important: Do not remove the grease on the chassis (metal rail).
- Once you have confirmed that the left and center portions of the timing strip are clean, gently slide the carriage all the way to the left.
- Repeat steps 4 & 5 for inspecting the right side of the timing strip until is completely free of grease and other matter.
- Gently close the operation panel.
- Reconnect the power cord and power on the printer.
(The indicator light blinks steadily while the printer initializes.) Note: After the printer is powered back on, you will receive a message on the printer's display that the printer was not properly turned off. Tap OK to clear the message and return the printer to standby mode.
- Confirm operation of the unit by printing a text document and photograph. Printing this document is a good test since it contains text and images. If print quality is still poor, repeat the above steps.
Enlarged Image
5 REPLIES 5
Options
- Mark as New
- Bookmark
- Subscribe
- Mute
- Subscribe to RSS Feed
- Permalink
- Report Inappropriate Content
01-16-2021 08:22 PM
Here are instructions on cleaning the encoder (timing) strip:
Description
Cleaning the encoder (timing) strip - MG5700 Series / MG6800 Series / MG7720
Solution
Click here to view an enlarged view of the timing strip.
The timing strip is a clear, plastic strip approximately 1/4 inch in height positioned horizontally across the center of the unit, just in front of the carriage drive belt. The timing strip contains many thin black vertical lines that help determine the carriage position during operation.
During certain uncommon tasks such as the removal of a paper jam, it is possible to inadvertently touch a lubricated area on the printer's chassis causing a small amount of grease to be deposited onto the timing strip.
Grease on the timing strip may result in poor print quality including; mis-aligned or distorted characters, vertical lines or, in some cases, an inoperable error condition (such as 5100) or knocking / grinding noise.
In most cases, it is easy to remove the grease from the timing strip using common household items. If you wish, you may follow the steps below to remove the grease from the timing strip.
Items needed:
-Clean, unused cotton swab
-Small amount of Isopropyl Alcohol or window cleaner
-Flashlight or other light source
- Holding sides of the paper output tray, gently open it.
- Power on the printer then lift up and open the operation panel until it stops.
The Print Head Holder (carriage) will move to ink changing (center) position.
- With the operation panel open, unplug the power cord from the wall outlet or power strip. Be sure the printer's power LED is no longer illuminated.
This will allow you to easily slide the carriage left to right. Note:- When you move the print head holder, hold the top of the print head holder and slide it slowly to the right edge or the left edge.
- When you move the print head holder, hold the top of the print head holder and slide it slowly to the right edge or the left edge.
- Gently slide the carriage to the right side.
| Carriage is centered |
| Carriage is to the right |
- Using a flashlight, carefully inspect the timing strip for grease that may have attached to the timing strip. It is helpful to view the timing strip from several angles as even a small amount of grease can impact print quality. Note: The timing strip is a clear strip located in front of the carriage drive belt.
- Moisten the cotton swab with Isopropyl alcohol and carefully remove the grease from the timing strip. To prevent further spreading of grease, be careful not to touch the chassis or other areas inside the unit which may contain grease from the factory. Note: If Isopropyl Alcohol is not available, you may use window cleaner solution. Important: Do not remove the grease on the chassis (metal rail).
- Once you have confirmed that the left and center portions of the timing strip are clean, gently slide the carriage all the way to the left.
- Repeat steps 4 & 5 for inspecting the right side of the timing strip until is completely free of grease and other matter.
- Gently close the operation panel.
- Reconnect the power cord and power on the printer.
(The indicator light blinks steadily while the printer initializes.) Note: After the printer is powered back on, you will receive a message on the printer's display that the printer was not properly turned off. Tap OK to clear the message and return the printer to standby mode.
- Confirm operation of the unit by printing a text document and photograph. Printing this document is a good test since it contains text and images. If print quality is still poor, repeat the above steps.
Enlarged Image
Options
- Mark as New
- Bookmark
- Subscribe
- Mute
- Subscribe to RSS Feed
- Permalink
- Report Inappropriate Content
02-13-2022 12:23 PM - edited 02-13-2022 12:34 PM
So, this actually worked. My print was coming out terrible. Words left unprinted, fuzzy. I ran every maintenance utility, deep clean, prin align, roller head etc all to no avail and no improvement on the terrible unreadable print. Then I found this page after a search and.. 👌 You have to look a bit for the clear 1/4 plastic strip... I used a q-tip dipped in alcohol and ran it all along that strip (followed directions exactly). I told my Husband that I very much doubted this would fix the problem. I saw nothing on the strip that looked dirty and no greasy deposits.. However, I plugged the machine back on and printed a page. To my amazement, a perfectly printed crisp print. Hooray!!
Options
- Mark as New
- Bookmark
- Subscribe
- Mute
- Subscribe to RSS Feed
- Permalink
- Report Inappropriate Content
02-13-2022 12:32 PM
If you are having blurry or missing print. Do this! It actually 100% fixed the issue. I was so doubtful this would help the problem, and so relieved when it worked. I thought the printer would need to go to a repair tech or I’d have to throw it away. Thanks for these instructions!
Options
- Mark as New
- Bookmark
- Subscribe
- Mute
- Subscribe to RSS Feed
- Permalink
- Report Inappropriate Content
02-22-2023 04:22 PM
Did not work for me! Still blurry!
Options
- Mark as New
- Bookmark
- Subscribe
- Mute
- Subscribe to RSS Feed
- Permalink
- Report Inappropriate Content
02-24-2023 02:14 PM
Hi,
Since the cleanings did not resolve the issue, the printer would need to be replaced.
If the printer is in it's 1 year warranty, I recommend reaching out to Canon support for your warranty options. You will need to register your Canon gear HERE to access additional support options.
If the printer is out of warranty, you would qualify for the Canon Upgrade program. This is for out of warranty units which have been diagnosed to require service or are incompatible with a new or upgraded system. This program allows you the opportunity to purchase a replacement product discounted from the list price. Free ground shipping is included with your purchase.
If you would like to take advantage of this offer, please call our Sales Department at (866) 443-8002 Mon-Sat, 9 AM to 9pm EST excluding holidays.
Did this answer your question? Please click the Accept as Solution button so that others may find the answer as well.
Announcements
04/16/2024: New firmware updates are available.
RF100-300mm F2.8 L IS USM - Version 1.0.6
RF400mm F2.8 L IS USM - Version 1.0.6
RF600mm F4 L IS USM - Version 1.0.6
RF800mm F5.6 L IS USM - Version 1.0.4
RF1200mm F8 L IS USM - Version 1.0.4
03/27/2024: RF LENS WORLD Launched!
03/26/2024: New firmware updates are available.
EOS 1DX Mark III - Version 1.9.0
03/22/2024: Canon Learning Center | Photographing the Total Solar Eclipse
02/29/2024: New software version 2.1 available for EOS WEBCAM UTILITY PRO
02/01/2024: New firmware version 1.1.0.1 is available for EOS C500 Mark II
12/05/2023: New firmware updates are available.
EOS R6 Mark II - Version 1.3.0
11/13/2023: Community Enhancements Announced
09/26/2023: New firmware version 1.4.0 is available for CN-E45-135mm T 2.4 L F
08/18/2023: Canon EOS R5 C training series is released.
07/31/2023: New firmware updates are available.
06/30/2023: New firmware version 1.0.5.1 is available for EOS-R5 C
Related Content
- canon pima MX532 prints blurry in Desktop Inkjet Printers
- PIXMA TR4720 won't print in BW, faint blurry printing, lines going through content in Desktop Inkjet Printers
- PIXMA MX922 Print is distorted and blurry in Desktop Inkjet Printers
- PIXMA MX490 prints lower half of first page blurry, other pages OK in Desktop Inkjet Printers
- Printing is all blurry on MG6821 in Desktop Inkjet Printers

Ⓒ 2024
Canon U.S.A Inc. All Rights Reserved. Reproduction in whole or part without permission is prohibited.
